Toshiba 42LX177 Owner's Manual - English - Page 20
Connecting an HDMI, or DVI device, to the HDMI input - refresh rate
 |
UPC - 022265000793
View all Toshiba 42LX177 manuals
Add to My Manuals
Save this manual to your list of manuals |
Page 20 highlights
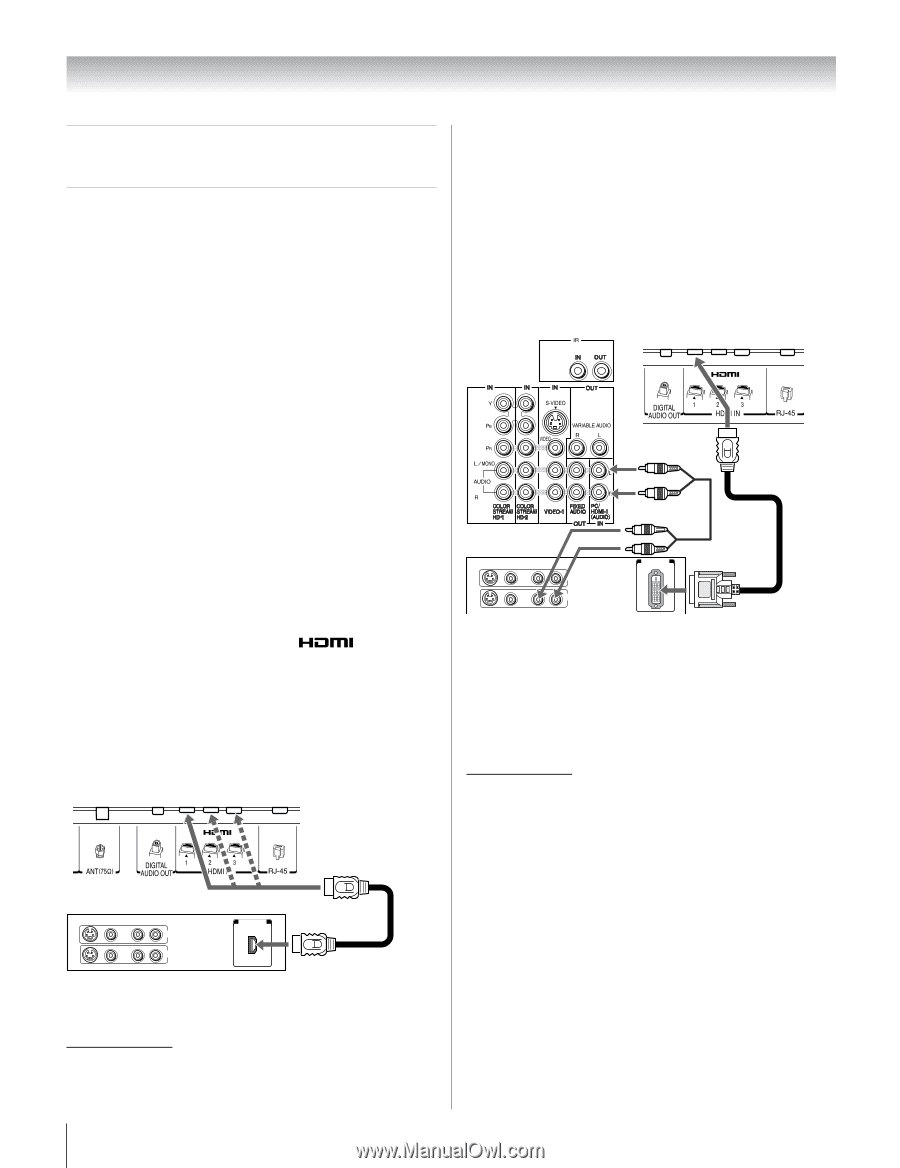
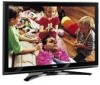
Chapter 2: Connecting your TV Connecting an HDMI™ or DVI device to the HDMI input The HDMI input on your TV receives digital audio and uncompressed digital video from an HDMI source device, or uncompressed digital video from a DVI (Digital Visual Interface) source device. This input is designed to accept HDCP (High-Bandwidth Digital-Content Protection) program material in digital form from EIA/CEA-861-D-compliant[1] consumer electronic devices (such as a set-top box or DVD player with HDMI or DVI output). The HDMI input can accept and display VGA, 480i (60Hz), 480p (60Hz), 720p (60Hz), 1080i (60Hz), and 1080p (24Hz/ 60Hz) signal formats. For detailed signal specifications, see page 109. Note: • Some of legacy HDMI sources may not work properly with your latest HDMI TV, due to new standard adoption. Please try to set Off the following three options (Lip-Sync Latency, Deep Color, xvYCC). Your legacy HDMI source should operate properly with your TV. See page 75. • Supported Audio format : Linear PCM, sampling rate 32/ 44.1/48kHz To connect an HDMI device, you will need: • one HDMI cable (type A connector) per HDMI device - For proper operation, it is recommended that you use an HDMI cable with the HDMI Logo ( ). - If your HDMI connection is capable of 1080p and/or your TV is capable of refresh rates greater than 60Hz or supports Deep Color™, you will need a Category 2 cable. Conventional HDMI/DVI cable may not work properly with this mode. - HDMI cable transfers both video and audio. Separate analog audio cables are not required (see illustration). - See "Setting the HDMI™ audio mode" (- page 48). TV lower back panel HDMI device VIDEO AUDIO L R IN IN OUT L R HDMI OUT To view the HDMI device video: Select the HDMI 1, HDMI 2, or HDMI 3 video input source on the TV.* * To select the video input source, press INPUT on the remote control (- page 27). To program the TV remote control to operate other devices, see Chapter 3. To connect a DVI device, you will need: • one HDMI-to-DVI adapter cable (HDMI type A connector) per DVI device - For proper operation, the length of an HDMI-to-DVI adapter cable should not exceed 9.8 ft (3m). The recommended length is 6.6 ft (2m). • one pair of standard analog audio cables per DVI device - An HDMI-to-DVI adapter cable transfers video only. Separate analog audio cables are required (see illustration). - See "Setting the HDMI™ audio mode" (- page 48). TV upper back panel TV lower back panel DVI device VIDEO AUDIO L R IN IN DVI / HDCP OUT OUT L R Note: To ensure that the HDMI or DVI device is reset properly, it is recommended that you follow these procedures: • When turning on your electronic components, turn on the TV first, and then the HDMI or DVI device. • When turning off your electronic components, turn off the HDMI or DVI device first, and then the TV. [1] EIA/CEA-861-D compliance covers the transmission of uncompressed digital video with high-bandwidth digital content protection, which is being standardized for reception of highdefinition video signals. Because this is an evolving technology, it is possible that some devices may not operate properly with the TV. HDMI, the HDMI logo and High-Definition Multimedia Interface are trademarks or registered trademarks of HDMI Licensing LLC. 20
-
 1
1 -
2
-
3
-
4
-
5
-
6
-
7
-
8
-
9
-
10
-
11
-
12
-
13
-
14
-
 15
15 -
 16
16 -
 17
17 -
 18
18 -
 19
19 -
 20
20 -
 21
21 -
 22
22 -
 23
23 -
 24
24 -
 25
25 -
26
-
27
-
28
-
29
-
30
-
31
-
32
-
33
-
34
-
35
-
36
-
37
-
38
-
39
-
40
-
41
-
42
-
43
-
44
-
45
-
46
-
47
-
48
-
49
-
50
-
51
-
52
-
53
-
54
-
55
-
56
-
57
-
58
-
59
-
60
-
61
-
62
-
63
-
64
-
65
-
66
-
67
-
68
-
69
-
70
-
71
-
72
-
73
-
74
-
75
-
76
-
77
-
78
-
79
-
80
-
81
-
82
-
83
-
84
-
85
-
86
-
87
-
88
-
89
-
90
-
91
-
92
-
93
-
94
-
95
-
96
-
97
-
98
-
99
-
100
-
101
-
102
-
103
-
104
-
105
-
106
-
107
-
108
-
109
-
110
-
111
-
112
-
113
-
114
-
115
-
116
-
117
-
118
 |
 |