Toshiba 57LX177 Owner's Manual - English - Page 99
F. Setting up the Personal E-mail, feature
 |
UPC - 022265000717
View all Toshiba 57LX177 manuals
Add to My Manuals
Save this manual to your list of manuals |
Page 99 highlights
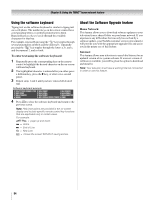
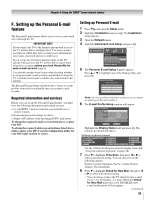
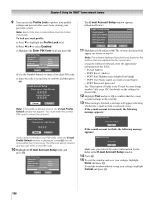
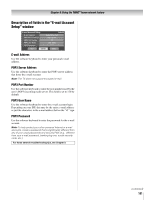
Chapter 8: Using the THINC™ home network feature F. Setting up the Personal E-mail feature The Personal E-mail feature allows you to access your e-mail server through the TV. IMPORTANT NOTE If you connect the TV to the Internet, anyone with access to the TV will be able to configure the TV to access e-mail accounts for which they have account access information (user name, password and server addresses). If you set up any personal e-mail accounts on the TV, anyone with access to the TV will be able to read e-mail from those accounts unless you lock the profile for each e-mail account (step 8). You should consider these factors when deciding whether to set up personal e-mail accounts and whether to keep the TV set connected (or make available easy connection) to the internet. The Personal E-mail Setup will allow up to 4 users to set up profiles from which each profile may access their e-mail account. Required information and services Before you can set up the Personal E-mail feature, you must have the following information and related services: a) A valid POP3 e-mail account that you normally use to receive e-mails. b) Login and password settings for above. c) Name or IP address of the incoming (POP3) mail server. To obtain the required e-mail services listed above, contact your ISP. To obtain the required addresses and settings listed above, either contact your ISP or use the configuration utility for your DSL/cable modem or router. Setting up Personal E-mail 1 Press Y and open the Setup menu. 2 Highlight Installation and press T. The Installation menu appears. 3 Open the Network menu. 4 Highlight Personal E-mail Setup and press T. Installation Network Basic Network Setup Personal E-mail Setup Home File Server Setup Software Upgrade 5 The Personal E-mail Setup window appears. Press B or b to highlight one of the blank profiles and press T. Personal E-mail Setup Please select a profile ----- Note: If all four profiles have been created, you can select an existing profile and modify it. 6 The E-mail Profile Setup window will appear. E-mail Profile Setup Display Name Time Zone Eastern Check for New Mail Disabled Profile Lock Enabled Enter PIN Code E-mail Account Setup Cancel Done Highlight the Display Name field and press T. The software keyboard will appear. Software keyboard example 1 1 4 g h i 4GH I 7 p q r s 7 PQRS _ 100 Backspace 2 a b c 2ABC 3 d e f 3DEF 5 j k l 5JKL 6 mn o 6MNO 8 t u v 8TUV 9 w x y z 9WX Y Z 0 0 INPUT Space Use the software keyboard to enter the display name. (- "Using the software keyboard" on page 94). 7 Press b to highlight Time Zone, then press C or c to select your desired setting. You can choose from the following options: Eastern, Central, Mountain, Pacific, Alaska, Hawaii, Atlantic, Newfoundland. 8 Press b to highlight Check for New Mail, then press C or c to select your desired setting. • You can choose to have the TV check for new e-mail every 5, 15, 30 minutes, or 1 hour. When the Check for New Mail interval is set to DISABLED, new e-mail notifications will not appear. (continued) 99
-
 1
1 -
2
-
3
-
4
-
5
-
6
-
7
-
8
-
9
-
10
-
11
-
12
-
13
-
14
-
15
-
16
-
17
-
18
-
19
-
20
-
21
-
22
-
23
-
24
-
25
-
26
-
27
-
28
-
29
-
30
-
31
-
32
-
33
-
34
-
35
-
36
-
37
-
38
-
39
-
40
-
41
-
42
-
43
-
44
-
45
-
46
-
47
-
48
-
49
-
50
-
51
-
52
-
53
-
54
-
55
-
56
-
57
-
58
-
59
-
60
-
61
-
62
-
63
-
64
-
65
-
66
-
67
-
68
-
69
-
70
-
71
-
72
-
73
-
74
-
75
-
76
-
77
-
78
-
79
-
80
-
81
-
82
-
83
-
84
-
85
-
86
-
87
-
88
-
89
-
90
-
91
-
92
-
93
-
 94
94 -
 95
95 -
 96
96 -
 97
97 -
 98
98 -
 99
99 -
 100
100 -
 101
101 -
 102
102 -
 103
103 -
 104
104 -
105
-
106
-
107
-
108
-
109
-
110
-
111
-
112
-
113
-
114
-
115
-
116
-
117
-
118
 |
 |
