Toshiba A50-D1538 Users Guide for A50-D / C50-D / R50-D / Z50-D English - Page 54
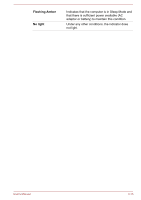
Power Condition Descriptions, DC IN/Battery indicator, Power indicator
 |
View all Toshiba A50-D1538 manuals
Add to My Manuals
Save this manual to your list of manuals |
Page 54 highlights
1. Right-click on the desktop and click Intel® Graphics Settings... 2. Click Power and then click On Battery in the upper-left corner. 3. Click Disable under Display Power Saving Technology. 4. Click Apply. If you want to enable this feature, click Enable under Display Power Saving Technology. Power Condition Descriptions The computer operating capability and battery charge status are affected by different power conditions, including whether an AC adaptor is connected and what the battery charge level is. DC IN/Battery indicator Check the DC IN/Battery indicator to determine the status of the battery pack and the power status with the AC adaptor connected. The following indicator conditions should be noted: Flashing Amber The battery charge is low. The AC adaptor must be connected to recharge the battery. Amber Indicates that the AC adaptor is connected and the battery is charging. White Indicates that the AC adaptor is connected and the battery is fully charged. Flashing White Indicates a problem with the computer. Disconnect the AC adaptor for several seconds, and remove the battery. Then reinstall the battery and reconnect the AC adaptor. If it still does not operate properly, you should contact your reseller or dealer. No light Under any other conditions, the indicator does not light. If the battery pack becomes too hot while it is being charged, the charge stops and the DC IN/Battery indicator goes out. When the temperature of the battery pack falls to a normal range, charging will resume. This process occurs regardless of whether the computer's power is on or off. Power indicator Check the Power indicator to determine the power status of the computer. The following indicator conditions should be noted: White Indicates that power is being supplied to the computer, and the computer is turned on. User's Manual 3-14
-
 1
1 -
2
-
3
-
4
-
5
-
6
-
7
-
8
-
9
-
10
-
11
-
12
-
13
-
14
-
15
-
16
-
17
-
18
-
19
-
20
-
21
-
22
-
23
-
24
-
25
-
26
-
27
-
28
-
29
-
30
-
31
-
32
-
33
-
34
-
35
-
36
-
37
-
38
-
39
-
40
-
41
-
42
-
43
-
44
-
45
-
46
-
47
-
48
-
 49
49 -
 50
50 -
 51
51 -
 52
52 -
 53
53 -
 54
54 -
 55
55 -
 56
56 -
 57
57 -
 58
58 -
 59
59 -
60
-
61
-
62
-
63
-
64
-
65
-
66
-
67
-
68
-
69
-
70
-
71
-
72
-
73
-
74
-
75
-
76
-
77
-
78
-
79
-
80
-
81
-
82
-
83
-
84
-
85
-
86
-
87
-
88
-
89
-
90
-
91
-
92
-
93
-
94
-
95
-
96
-
97
-
98
-
99
-
100
-
101
-
102
-
103
-
104
-
105
-
106
-
107
-
108
-
109
-
110
-
111
-
112
-
113
-
114
-
115
-
116
-
117
-
118
-
119
-
120
-
121
-
122
-
123
-
124
-
125
-
126
-
127
-
128
-
129
-
130
-
131
-
132
-
133
-
134
-
135
-
136
-
137
-
138
-
139
-
140
-
141
-
142
-
143
-
144
-
145
-
146
-
147
-
148
-
149
-
150
-
151
-
152
-
153
-
154
-
155
-
156
-
157
-
158
-
159
-
160
-
161
-
162
-
163
-
164
-
165
-
166
-
167
-
168
-
169
-
170
-
171
-
172
-
173
-
174
-
175
-
176
-
177
-
178
-
179
-
180
 |
 |
