Toshiba BDX4250KU Owners Manual - Page 21
Customizing the Function Settings
 |
View all Toshiba BDX4250KU manuals
Add to My Manuals
Save this manual to your list of manuals |
Page 21 highlights
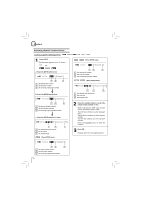
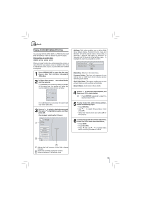
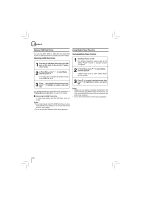
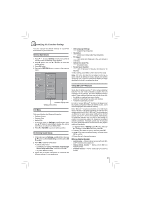
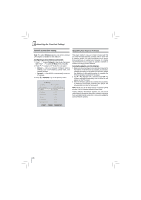
Customizing the Function Settings You can change the default settings to customize performance to your preference. General Operations 1. Press / to select Settings in home menu while in full stop mode, the Settings menu appears. 2. Press button, then use / button to select the setting options. 3. Press OK button. 4. Press or RETURN button to return to the previous menu. Home Menu Info Media Quick Setup BD-Live • OSD Language Settings (English/French/Spanish) • Resolution (HDMI Auto/1080p/1080i/720p/480p/480i) • TV Aspect (16:9 Wide/16:9 Pillabox/4:3 Pan and Scan/4:3 Letterbox) • Optical Disc Auto Play (Disable/Enable) • Screen Saver Duration (Off /5 Minutes/10 Minutes/ 20 Minutes/ 30 Minutes) 4. After setting, press OK to confirm and exit the setup. Note: If it is the first time for the player to start up or users restore all settings to factory defaults, the system will prompt you to perform Quick Setup. Repeat the steps described as above to complete the setup. Settings Display Using BD-Live™ Features Connected Audio A Language Parental submenu display area Settings menu items Info Menu This menu displays the following information: • Software Version • Software Date • Netflix ESN 1. In the main menu of Settings, press button, then use / button to select Info to display the version information on software and Netflix ESN. 2. Press or RETURN to go to the previous menu. Performing Quick-Setup 1. In the main menu of Settings, press button, then use / button to select Quick Setup, and then press OK to confirm. 2. Press OK to perform Quick Setup. To exit the setup menu: • Use button to highlight "No thanks. I'll go through the full setup menu later", and then press OK. • Or press button directly. 3. Follow the on-screen instructions to customize the following settings to your preference: Some (but not all) Blu-ray Disc™ discs contain additional features that are made available to players that are connected to the internet, and have additional memory added. These additional features may include things like: • the ability to download new movie trailers • additional 'commentary' by actors and directors • multiperson game play and chat In order to access BD-Live™ functions, the player must be properly configured for BD-Live internet access, and it must be equipped with additional memory. Note: BD-Live™ requires connection of a USB flash drive of at least 1 GB (sold separately) to USB port. For models without built-in Wi-Fi®, BD-Live™ is only supported via Ethernet so when using single USB port for internet access, BD-Live™ will not be available. Performance of interactive features may vary due to disc design or content, and may also require an always-on broadband internet connection. Firmware update may be required for some interactive features. Some features may require additional bandwidth. 1. In the main menu of Settings, press button, then use / button to select BD-Live, then press OK. 2. Press / to select an option, and then press OK. 3. Use / to select the desired setting, and then press OK to confirm. 4. Press to go to the previous menu. BD-Live Internet Access: • Limit Access - Allows Internet access with valid BDLive™ network access approval. • Always Allow Access - Always allows BD-Live Internet access. • Prohibit Access - Never allows BD-Live Internet access. 21
-
 1
1 -
2
-
3
-
4
-
5
-
6
-
7
-
8
-
9
-
10
-
11
-
12
-
13
-
14
-
15
-
 16
16 -
 17
17 -
 18
18 -
 19
19 -
 20
20 -
 21
21 -
 22
22 -
 23
23 -
 24
24 -
 25
25 -
 26
26 -
27
-
28
-
29
-
30
-
31
-
32
-
33
-
34
-
35
-
36
-
37
-
38
-
39
-
40
-
41
-
42
-
43
-
44
-
45
-
46
-
47
-
48
-
49
-
50
-
51
-
52
-
53
-
54
-
55
-
56
 |
 |