Toshiba DKT3010-SD Quick Reference Guide - Page 2
Operation, How the keys work - phone
 |
View all Toshiba DKT3010-SD manuals
Add to My Manuals
Save this manual to your list of manuals |
Page 2 highlights
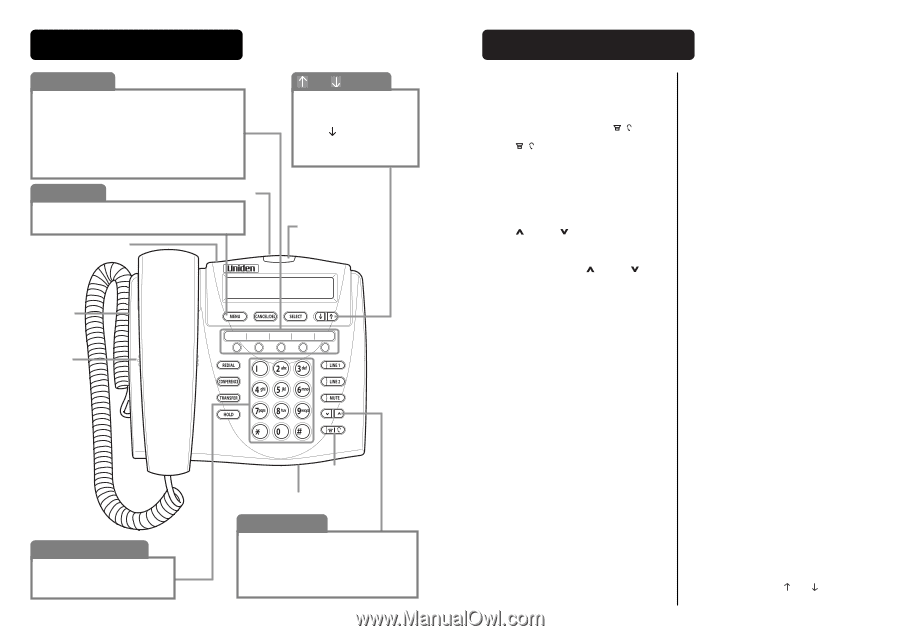
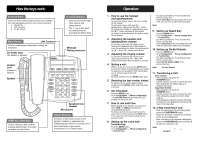
How the keys work: Function Keys: There are five programmable function keys available that can individually perform one of three functions: 1. Speed Dial 2. Dial Voicemail 3. Do Not Disturb Note: "Voicemail" and "Do Not Disturb" function can only be assigned to one function key. Menu Button: LAN Connector Used to view/change configuration settings on the phone. DC Power Input (AC Adapter is optional) Headset Jack (Headset is optional) Speaker and Buttons: • Used for scrolling through menu options and editing entries. • The key is also used as a shortcut key for accessing the phone book. Message Waiting Indication DTMF Keys (Dial Pad): Used in dialing as well as when entering alphanumeric characters as written on each button. Speakerphone/ Headset Microphone Volume Buttons: Increases or decreases volume of the handset, headset, or speakerphone. (Depending upon which is currently active.) Also controls the ringer volume. (If the phone is in on-hook mode.) Operation: 1. How to use the handset and speakerphone: • To place and answer calls on the phone, simply lift the handset. • To place and answer calls using the speakerphone, simply press the | button. • To change from handset to speakerphone, press the | button and hang up the handset. • To change from speakerphone to handset, simply lift the handset. 2. Adjusting the handset and speakerphone volume: • To increase or decrease the volume of your handset and speakerphone, lift the handset or press the speakerphone button first and press the up ( ) / down ( ) volume control button. 3. Adjusting the ringing volume: • To increase or decrease the volume of your ringer, just press the up ( ) / down ( ) volume control button while the phone is on hook. 4. Muting a call: • While in a call, you can press the MUTE button to mute the handset or speakerphone, preventing the party you are speaking to from hearing what you or someone else in the room is saying. • To return normal, press the MUTE button again. 5. Redialing the last number dialed: • To redial the most recently dialed number, simply press the REDIAL button while the phone is off hook. 6. Set Time/Date: • Press the MENU button. • Go to Configuration → Phone Configuration → Local Date/Time and then follow the LCD prompts for setting the time. 7. How to use multi line: • Before picking up the handset, you can select either LINE 1 or LINE 2 by pressing the corresponding line button. • To make a second call, you must first put the active call on hold by pressing the HOLD button. Then, select the idle line by pressing the line selection button. 8. Setting up the voice mail function key: • Press the MENU button. • Go to Configuration → Phone Configuration → Function Key. • You will be prompted to "Press Function Key". Press a function key. • Select Voice Mail in the proceeding menu and enter the voice mail number when prompted. Note: The voice mail calling function may only be assigned to one function button. 9. Setting up Speed dial: • Press the MENU button. • Go to Configuration → Phone Configuration → Function Key. • You will be prompted to "Press Function Key". Press a function key. • Select Speed Dial in the proceeding menu and enter the speed dial number when prompted. 10. Setting up Do Not Disturb: • Press the MENU button. • Go to Configuration → Phone Configuration → Function Key. • You will be prompted to "Press Function Key". Press a function key. • Select Do Not Disturb (DND) in the proceeding menu. Note: The Do Not Disturb function may only be assigned to one function button. 11. Transferring a Call: Blind Transfer • After receiving a call, press the TRANSFER button. • Dial the extension you wish to transfer the call to. • Upon hearing the line ringing, hang up to complete the transfer. Supervised Transfer • After receiving a call, press the TRANSFER button. • Dial the extension you wish to transfer the call to. • If the called party accepts the transfer, simply hang up. • If the called party rejects the transfer and hangs up, follow the voice guided menu and press 4 to return to the initial caller. 12. 3 Way Conference Call: • After connecting with the first calling party, press the CONFERENCE button. • Press the "#" button, and dial the extension of the second calling party. • After connecting to the second calling party press the CONFERENCE button and then 5 to start the conference call. Note: In order to select the desired function, please scroll using and button then press SELECT key.
-
 1
1 -
 2
2
 |
 |