Toshiba F50 PQF55C-01U01C Users Manual Canada; English - Page 188
External monitor, Safely Remove Hardware
 |
View all Toshiba F50 PQF55C-01U01C manuals
Add to My Manuals
Save this manual to your list of manuals |
Page 188 highlights
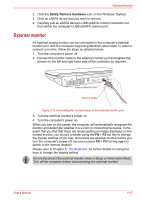
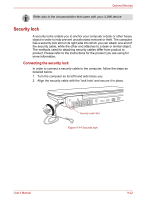
Optional Devices 2. Click the Safely Remove Hardware icon on the Windows Taskbar. 3. Click an eSATA device that you want to remove. 4. Carefully pull an eSATA device's USB (eSATA combo) connector out from within the computer's USB (eSATA combo) port. External monitor An external analog monitor can be connected to the computer's external monitor port, with the computer supporting WUXGA video mode. In order to connect a monitor, follow the steps as detailed below: 1. Turn the computer's power off. 2. Connect the monitor cable to the external monitor port and tighten the screws on the left and right hand side of the connector as required. External Monitor Port Monitor Cable Figure 9-11 Connecting the monitor cable to the external monitor port 3. Turn the external monitor's power on. 4. Turn the computer's power on. When you turn on the power, the computer will automatically recognize the monitor and determine whether it is a color or monochrome device. In the event that you find that there are issues getting an image displayed on the correct monitor, you should consider using the FN + F5 hot key to change the display settings (if you then disconnect the external monitor before you turn the computer's power off, be sure to press FN + F5 hot key again to switch to the internal display). Please refer to Chapter 5, The Keyboard, for further details on using hot keys to change the display setting. Do not disconnect the external monitor while in Sleep or Hibernation Mode. Turn off the computer before disconnecting the external monitor. User's Manual 9-17
-
 1
1 -
2
-
3
-
4
-
5
-
6
-
7
-
8
-
9
-
10
-
11
-
12
-
13
-
14
-
15
-
16
-
17
-
18
-
19
-
20
-
21
-
22
-
23
-
24
-
25
-
26
-
27
-
28
-
29
-
30
-
31
-
32
-
33
-
34
-
35
-
36
-
37
-
38
-
39
-
40
-
41
-
42
-
43
-
44
-
45
-
46
-
47
-
48
-
49
-
50
-
51
-
52
-
53
-
54
-
55
-
56
-
57
-
58
-
59
-
60
-
61
-
62
-
63
-
64
-
65
-
66
-
67
-
68
-
69
-
70
-
71
-
72
-
73
-
74
-
75
-
76
-
77
-
78
-
79
-
80
-
81
-
82
-
83
-
84
-
85
-
86
-
87
-
88
-
89
-
90
-
91
-
92
-
93
-
94
-
95
-
96
-
97
-
98
-
99
-
100
-
101
-
102
-
103
-
104
-
105
-
106
-
107
-
108
-
109
-
110
-
111
-
112
-
113
-
114
-
115
-
116
-
117
-
118
-
119
-
120
-
121
-
122
-
123
-
124
-
125
-
126
-
127
-
128
-
129
-
130
-
131
-
132
-
133
-
134
-
135
-
136
-
137
-
138
-
139
-
140
-
141
-
142
-
143
-
144
-
145
-
146
-
147
-
148
-
149
-
150
-
151
-
152
-
153
-
154
-
155
-
156
-
157
-
158
-
159
-
160
-
161
-
162
-
163
-
164
-
165
-
166
-
167
-
168
-
169
-
170
-
171
-
172
-
173
-
174
-
175
-
176
-
177
-
178
-
179
-
180
-
181
-
182
-
 183
183 -
 184
184 -
 185
185 -
 186
186 -
 187
187 -
 188
188 -
 189
189 -
 190
190 -
 191
191 -
 192
192 -
 193
193 -
194
-
195
-
196
-
197
-
198
-
199
-
200
-
201
-
202
-
203
-
204
-
205
-
206
-
207
-
208
-
209
-
210
-
211
-
212
-
213
-
214
-
215
-
216
-
217
-
218
-
219
-
220
-
221
-
222
-
223
-
224
-
225
-
226
-
227
-
228
-
229
-
230
-
231
-
232
-
233
-
234
-
235
-
236
-
237
-
238
-
239
-
240
-
241
-
242
-
243
-
244
-
245
-
246
-
247
-
248
-
249
-
250
-
251
-
252
-
253
-
254
-
255
-
256
-
257
-
258
-
259
 |
 |
