Toshiba HDTD205XK3D1 NTI Backup Now EZ v3 User’s Guide - Page 12
Complete System Restore, Creating a Bootable USB Flash Drive, Running Backup Now EZ on Startup
 |
View all Toshiba HDTD205XK3D1 manuals
Add to My Manuals
Save this manual to your list of manuals |
Page 12 highlights
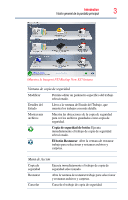
12 Running and Managing a Backup Job Creating a Bootable USB Flash Drive Complete System Restore Restoring in Complete System: 1 In the Action menu select Restore, or at the bottom right of the main screen click the Restore ( ) button. 2 Click the Complete System Restore tab. 3 The steps in restoring the complete system are displayed. You can also print out the steps along with the graphics if needed. Restore Options: Location-You can restore the backup files to the original location by selecting Original, or change the location by selecting Other and then specify the location in the box next to it. Overwrite Original Files-This option replaces the original files with the backed up files. Creating a Bootable USB Flash Drive To select the drive to make bootable: 1 Click the Tools menu and select Create Bootable USB Flash Drive. 2 Select the USB flash drive through the dropdown box. 3 Click Start to create the bootable USB flash drive. Running Backup Now EZ on Startup Backup Now EZ automatically launches during startup if there is at least one enabled job previously set to backup at Startup and the application was running when the system was last rebooted or shut down. It is important to have Backup Now EZ running when you are adding, deleting, and modifying data from the backup source. This is the best way to keep your backup destination up to date. Contacting Toshiba Toshiba's technical support Web site For technical support, or to stay current on the most recent software and hardware options for your Product and for other Product information, be sure to regularly check the Toshiba Web site at support.toshiba.com.
-
 1
1 -
2
-
3
-
4
-
5
-
6
-
 7
7 -
 8
8 -
 9
9 -
 10
10 -
 11
11 -
 12
12 -
 13
13 -
 14
14 -
 15
15 -
 16
16 -
 17
17 -
18
-
19
-
20
-
21
-
22
-
23
-
24
-
25
-
26
-
27
-
28
-
29
-
30
-
31
-
32
-
33
-
34
-
35
-
36
-
37
-
38
-
39
-
40
-
41
-
42
-
43
-
44
-
45
-
46
-
47
 |
 |
