Toshiba L510 PSLQ0C-00X00C Users Manual Canada; English - Page 97
LAN, Start, Control Panel, System and Security, System, Device Manager, Network adapters, Enable
 |
View all Toshiba L510 PSLQ0C-00X00C manuals
Add to My Manuals
Save this manual to your list of manuals |
Page 97 highlights
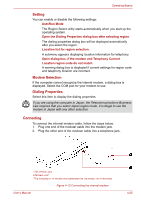
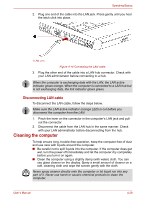
Operating Basics Indicator status Indication Indicator off Wireless communication hot key is set to off. Indicator glows Wireless communication hot key is on. Wireless LAN or Bluetooth is turned on by an application. If you used the Task Bar to disable Wireless LAN, restart the computer or follow the procedures below to enable the system to recognize Wireless LAN. Click Start → Control Panel → System and Security → System → Device Manager → Network adapters, and right click the wireless device then choose Enable. It may not be possible to make a network connection to a specified network name using the ad hoc network function. If this occurs, the new network(*) will have to be configured for all computers connected to the same network in order to re-enable network connections. * Please be sure to use new network name. LAN The computer has built-in support for Ethernet LAN (10 megabits per second,10BASE-T) or Fast Ethernet LAN (100 megabits per second, 100BASETX). This section describes how to connect/disconnect to a LAN. Do not install or remove an optional memory module while Wake-up on LAN is enabled. The Wake-up on LAN function consumes power even when the system is off. Leave the AC adapter connected while using this feature. Connecting LAN cable The computer must be configured properly before connecting to a LAN. Logging onto a LAN using the computer's default settings could cause a malfunction in LAN operation. Check with your LAN administrator regarding set-up procedures. If you are using Fast Ethernet LAN (100 Mbit/s, 100BASE-TX), be sure to connect with a category 5 cable, CAT5, or higher. If you are using Ethernet LAN (10 Mbit/s, 10BASE-T), connect with a category 3 cable, CAT3, or higher. To connect the LAN cable, follow the steps below. 1. Turn off the power to the computer and to all external devices con- nected to the computer. User's Manual 4-28
-
 1
1 -
2
-
3
-
4
-
5
-
6
-
7
-
8
-
9
-
10
-
11
-
12
-
13
-
14
-
15
-
16
-
17
-
18
-
19
-
20
-
21
-
22
-
23
-
24
-
25
-
26
-
27
-
28
-
29
-
30
-
31
-
32
-
33
-
34
-
35
-
36
-
37
-
38
-
39
-
40
-
41
-
42
-
43
-
44
-
45
-
46
-
47
-
48
-
49
-
50
-
51
-
52
-
53
-
54
-
55
-
56
-
57
-
58
-
59
-
60
-
61
-
62
-
63
-
64
-
65
-
66
-
67
-
68
-
69
-
70
-
71
-
72
-
73
-
74
-
75
-
76
-
77
-
78
-
79
-
80
-
81
-
82
-
83
-
84
-
85
-
86
-
87
-
88
-
89
-
90
-
91
-
 92
92 -
 93
93 -
 94
94 -
 95
95 -
 96
96 -
 97
97 -
 98
98 -
 99
99 -
 100
100 -
 101
101 -
 102
102 -
103
-
104
-
105
-
106
-
107
-
108
-
109
-
110
-
111
-
112
-
113
-
114
-
115
-
116
-
117
-
118
-
119
-
120
-
121
-
122
-
123
-
124
-
125
-
126
-
127
-
128
-
129
-
130
-
131
-
132
-
133
-
134
-
135
-
136
-
137
-
138
-
139
-
140
-
141
-
142
-
143
-
144
-
145
-
146
-
147
-
148
-
149
-
150
-
151
-
152
-
153
-
154
-
155
-
156
-
157
-
158
-
159
-
160
-
161
-
162
-
163
-
164
-
165
-
166
-
167
-
168
-
169
-
170
-
171
-
172
-
173
-
174
-
175
-
176
-
177
-
178
-
179
-
180
-
181
-
182
-
183
-
184
-
185
-
186
-
187
-
188
-
189
-
190
 |
 |