Toshiba L870D PSKFQC-00E005 Users Manual Canada; English - Page 100
Security lock, Desktop, Desktop Assist, Control Panel, Appearance and Personalization, Display
 |
View all Toshiba L870D PSKFQC-00E005 manuals
Add to My Manuals
Save this manual to your list of manuals |
Page 100 highlights
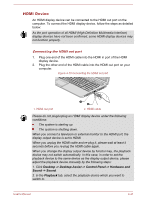
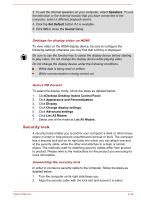
3. To use the internal speakers on your computer, select Speakers. To use the television or the external monitor that you have connected to the computer, select a different playback device. 4. Click the Set Default button if it is available. 5. Click OK to close the Sound dialog. Settings for display video on HDMI To view video on the HDMI display device, be sure to configure the following settings otherwise you may find that nothing is displayed. Be sure to use the function key to select the display device before starting to play video. Do not change the display device while playing video. Do not change the display device under the following conditions. While data is being read or written. While communication is being carried out. Select HD Format To select the display mode, follow the steps as detailed below: 1. ClickDesktop Desktop Assist Control Panel. 2. Click Appearance and Personalization. 3. Click Display. 4. Click Change display settings. 5. Click Advanced settings. 6. Click List All Modes. 7. Select one of the mode at List All Modes. Security lock A security locks enable you to anchor your computer a desk or other heavy object in order to help prevent unauthorized removal or theft. The computer has a security lock slot on its right side into which you can attach one end of the security cable, while the other end attaches to a desk or similar object. The methods used for attaching security cables differ from product to product. Please refer to the instructions for the product you are using for more information. Connecting the security lock In order to connect a security cable to the computer, follow the steps as detailed below: 1. Turn the computer so its right side faces you. 2. Align the security cable with the lock slot and secure it in place. User's Manual 4-42
-
 1
1 -
2
-
3
-
4
-
5
-
6
-
7
-
8
-
9
-
10
-
11
-
12
-
13
-
14
-
15
-
16
-
17
-
18
-
19
-
20
-
21
-
22
-
23
-
24
-
25
-
26
-
27
-
28
-
29
-
30
-
31
-
32
-
33
-
34
-
35
-
36
-
37
-
38
-
39
-
40
-
41
-
42
-
43
-
44
-
45
-
46
-
47
-
48
-
49
-
50
-
51
-
52
-
53
-
54
-
55
-
56
-
57
-
58
-
59
-
60
-
61
-
62
-
63
-
64
-
65
-
66
-
67
-
68
-
69
-
70
-
71
-
72
-
73
-
74
-
75
-
76
-
77
-
78
-
79
-
80
-
81
-
82
-
83
-
84
-
85
-
86
-
87
-
88
-
89
-
90
-
91
-
92
-
93
-
94
-
 95
95 -
 96
96 -
 97
97 -
 98
98 -
 99
99 -
 100
100 -
 101
101 -
 102
102 -
 103
103 -
 104
104 -
 105
105 -
106
-
107
-
108
-
109
-
110
-
111
-
112
-
113
-
114
-
115
-
116
-
117
-
118
-
119
-
120
-
121
-
122
-
123
-
124
-
125
-
126
-
127
-
128
-
129
-
130
-
131
-
132
-
133
-
134
-
135
-
136
-
137
-
138
-
139
-
140
-
141
-
142
-
143
-
144
-
145
-
146
 |
 |