Toshiba PDR-M25 User Guide - Page 43
Setting the Image Size and Quality
 |
UPC - 032017108370
View all Toshiba PDR-M25 manuals
Add to My Manuals
Save this manual to your list of manuals |
Page 43 highlights
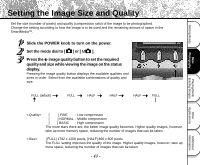
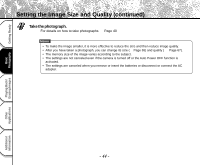
Getting Ready Basic Photography Setting the Image Size and Quality Set the size (number of pixels) and quality (compression ratio) of the image to be photographed. Change the setting according to how the image is to be used and the remaining amount of space in the SmartMedia™. Slide the POWER knob to turn on the power. Set the mode dial to [ ] or [ ]. Press the image quality button to set the required quality and size while viewing the image on the status display. Pressing the image quality button displays the available qualities and sizes in order. Select from the available combinations of quality and size. ★★FULL (default) ★★★FULL ★HALF ★★HALF ★★★HALF ★FULL Playing Back/ Erasing Images Other Applications Additional Information [★★★] FINE : Low compression [H★★] NORMAL : Middle compression [HH★] BASIC : High compression The more stars there are, the better image quality becomes. Higher quality images, however, take up more memory space, reducing the number of images that can be taken. [FULL] 1792 x 1200 pixels, [HALF] 896 x 600 pixels The FULL setting improves the quality of the image. Higher quality images, however, take up more space, reducing the number of images that can be taken. - 43 -
-
 1
1 -
2
-
3
-
4
-
5
-
6
-
7
-
8
-
9
-
10
-
11
-
12
-
13
-
14
-
15
-
16
-
17
-
18
-
19
-
20
-
21
-
22
-
23
-
24
-
25
-
26
-
27
-
28
-
29
-
30
-
31
-
32
-
33
-
34
-
35
-
36
-
37
-
 38
38 -
 39
39 -
 40
40 -
 41
41 -
 42
42 -
 43
43 -
 44
44 -
 45
45 -
 46
46 -
 47
47 -
 48
48 -
49
-
50
-
51
-
52
-
53
-
54
-
55
-
56
-
57
-
58
-
59
-
60
-
61
-
62
-
63
-
64
-
65
-
66
-
67
-
68
-
69
-
70
-
71
-
72
-
73
-
74
-
75
-
76
-
77
-
78
-
79
-
80
-
81
-
82
-
83
-
84
-
85
-
86
-
87
-
88
-
89
-
90
-
91
-
92
-
93
-
94
-
95
-
96
-
97
-
98
-
99
-
100
-
101
-
102
 |
 |
