Toshiba Satellite C40D-A PSCDSC-007003 Users Manual Canada; English - Page 94
SHIFT, Settings, Power, Restart, ENTER, Delete, Change, Owner String, Apply
 |
View all Toshiba Satellite C40D-A PSCDSC-007003 manuals
Add to My Manuals
Save this manual to your list of manuals |
Page 94 highlights
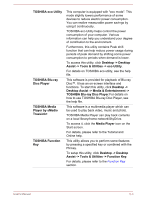
When entering the character string to register the password, enter from the keyboard character by character and do not enter as ASCII code or copy-and-paste the character string. In addition, ensure that the registered password is correct by outputting the character string to the password file. When entering a password, do not enter any characters (for example "!" or "#") produced by pressing the SHIFT or ALT keys. Delete (button) Click this button to delete a registered password. Before you can delete a password, you must first enter the current password correctly. Change (button) Click this button to change a registered password. Before you can change a password, you must first enter the current password correctly. Owner String (text box) You can use this box to associate text with the password. After you enter text, click Apply or OK. When the computer is started, this text will be displayed together with the prompt asking you to enter a password. You can use BIOS Setup to set, change or delete the HDD Password or HDD Master Password. To start BIOS Setup. 1. In the Settings charm, click Power and then select Restart. 2. Hold down the F2 key and then release this key one second after the computer is power on - the BIOS setup utility will load. To end the BIOS Setup, press F10, and then press ENTER to accept the changes. The computer will restart. If you forget your HDD User Password, TOSHIBA will NOT be able to assist you, and your HDD will be rendered COMPLETELY and PERMANENTLY INOPERABLE. TOSHIBA will NOT be held responsible for any loss of any data, any loss of use or access to your HDD, or for any other losses to you or any other person or organization that result from the loss of access to your HDD. If you can't accept this risk, don't register the HDD User Password. When saving the HDD User Password shut down or restart the computer. If the computer is not shut down or restarted, the saved data may not be correctly reflected. For more information on shutting down or restarting the computer, refer to Turning on the power. User's Manual 5-8
-
 1
1 -
2
-
3
-
4
-
5
-
6
-
7
-
8
-
9
-
10
-
11
-
12
-
13
-
14
-
15
-
16
-
17
-
18
-
19
-
20
-
21
-
22
-
23
-
24
-
25
-
26
-
27
-
28
-
29
-
30
-
31
-
32
-
33
-
34
-
35
-
36
-
37
-
38
-
39
-
40
-
41
-
42
-
43
-
44
-
45
-
46
-
47
-
48
-
49
-
50
-
51
-
52
-
53
-
54
-
55
-
56
-
57
-
58
-
59
-
60
-
61
-
62
-
63
-
64
-
65
-
66
-
67
-
68
-
69
-
70
-
71
-
72
-
73
-
74
-
75
-
76
-
77
-
78
-
79
-
80
-
81
-
82
-
83
-
84
-
85
-
86
-
87
-
88
-
 89
89 -
 90
90 -
 91
91 -
 92
92 -
 93
93 -
 94
94 -
 95
95 -
 96
96 -
 97
97 -
 98
98 -
 99
99 -
100
-
101
-
102
-
103
-
104
-
105
-
106
-
107
-
108
-
109
-
110
-
111
-
112
-
113
-
114
-
115
-
116
-
117
-
118
-
119
-
120
-
121
-
122
-
123
-
124
-
125
-
126
-
127
-
128
-
129
-
130
-
131
-
132
-
133
-
134
-
135
-
136
-
137
-
138
 |
 |
