Toshiba Satellite NB10t-A PU141C-01G020 Users Manual Canada; English - Page 56
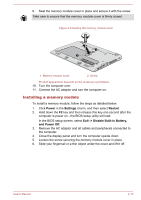
Removing a memory module, Power, Settings, Restart, Exit -> Disable Built-in Battery, and Power Off
 |
View all Toshiba Satellite NB10t-A PU141C-01G020 manuals
Add to My Manuals
Save this manual to your list of manuals |
Page 56 highlights
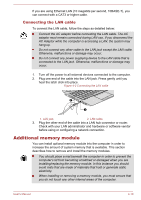
Use only memory modules approved by TOSHIBA. Do not try to install or remove a memory module under the following conditions. a. The computer is turned on. b. The computer was shut down in either Sleep or Hibernation Mode. c. Wake-up on LAN is enabled. d. The wireless communication function is on. Be careful not to let screws or other foreign matter fall into the computer. It could cause malfunction or electric shock. Additional memory module is a precision electronic component that may be fatally damaged by static electricity. Since the human body can carry static electricity, it is important that you discharge yourself before touching or installing any additional memory modules. To discharge your body's static electricity, simply touch any metal close to you with bare hands. Use a point size 0 Phillips screwdriver to remove and fasten the screws the use of an incorrect screwdriver can damage the screw heads. Removing a memory module To remove the memory module, follow the steps as detailed below: 1. Click Power in the Settings charm, and then select Restart. 2. Hold down the F2 key and then release this key one second after the computer is power on - the BIOS setup utility will load. In the BIOS setup screen, select Exit -> Disable Built-in Battery, and Power Off. 3. Remove the AC adaptor and all cables and peripherals connected to the computer. 4. Close the display panel and turn the computer upside down. 5. Loosen the screw securing the memory module cover in place. User's Manual 4-11
-
 1
1 -
2
-
3
-
4
-
5
-
6
-
7
-
8
-
9
-
10
-
11
-
12
-
13
-
14
-
15
-
16
-
17
-
18
-
19
-
20
-
21
-
22
-
23
-
24
-
25
-
26
-
27
-
28
-
29
-
30
-
31
-
32
-
33
-
34
-
35
-
36
-
37
-
38
-
39
-
40
-
41
-
42
-
43
-
44
-
45
-
46
-
47
-
48
-
49
-
50
-
 51
51 -
 52
52 -
 53
53 -
 54
54 -
 55
55 -
 56
56 -
 57
57 -
 58
58 -
 59
59 -
 60
60 -
 61
61 -
62
-
63
-
64
-
65
-
66
-
67
-
68
-
69
-
70
-
71
-
72
-
73
-
74
-
75
-
76
-
77
-
78
-
79
-
80
-
81
-
82
-
83
-
84
-
85
-
86
-
87
-
88
-
89
-
90
-
91
-
92
-
93
-
94
-
95
-
96
-
97
-
98
-
99
-
100
-
101
-
102
-
103
-
104
-
105
-
106
-
107
-
108
-
109
-
110
-
111
-
112
-
113
-
114
-
115
-
116
-
117
-
118
 |
 |