Toshiba Satellite P50t-B PSPNVC-01N00Q Users Manual Canada; English - Page 77
Installing a memory module, Restart, Exit -> Disable Built-in Battery, and Power Off
 |
View all Toshiba Satellite P50t-B PSPNVC-01N00Q manuals
Add to My Manuals
Save this manual to your list of manuals |
Page 77 highlights
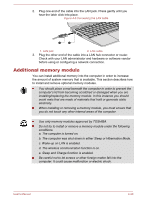
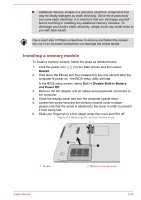
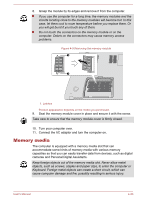
Additional memory module is a precision electronic component that may be fatally damaged by static electricity. Since the human body can carry static electricity, it is important that you discharge yourself before touching or installing any additional memory modules. To discharge your body's static electricity, simply touch any metal close to you with bare hands. Use a point size 0 Phillips screwdriver to remove and fasten the screws the use of an incorrect screwdriver can damage the screw heads. Installing a memory module To install a memory module, follow the steps as detailed below: 1. Click the power icon ( ) on the Start screen and then select Restart. 2. Hold down the F2 key and then release this key one second after the computer is power on - the BIOS setup utility will load. In the BIOS setup screen, select Exit -> Disable Built-in Battery, and Power Off. 3. Remove the AC adaptor and all cables and peripherals connected to the computer. 4. Close the display panel and turn the computer upside down. 5. Loosen the screw securing the memory module cover in place please note that the screw is attached to the cover in order to prevent it from being lost. 6. Slide your fingernail or a thin object under the cover and lift it off. Figure 4-6 Removing the memory module cover 2 1. Screw 1 2. Memory module cover User's Manual 4-30
-
 1
1 -
2
-
3
-
4
-
5
-
6
-
7
-
8
-
9
-
10
-
11
-
12
-
13
-
14
-
15
-
16
-
17
-
18
-
19
-
20
-
21
-
22
-
23
-
24
-
25
-
26
-
27
-
28
-
29
-
30
-
31
-
32
-
33
-
34
-
35
-
36
-
37
-
38
-
39
-
40
-
41
-
42
-
43
-
44
-
45
-
46
-
47
-
48
-
49
-
50
-
51
-
52
-
53
-
54
-
55
-
56
-
57
-
58
-
59
-
60
-
61
-
62
-
63
-
64
-
65
-
66
-
67
-
68
-
69
-
70
-
71
-
 72
72 -
 73
73 -
 74
74 -
 75
75 -
 76
76 -
 77
77 -
 78
78 -
 79
79 -
 80
80 -
 81
81 -
 82
82 -
83
-
84
-
85
-
86
-
87
-
88
-
89
-
90
-
91
-
92
-
93
-
94
-
95
-
96
-
97
-
98
-
99
-
100
-
101
-
102
-
103
-
104
-
105
-
106
-
107
-
108
-
109
-
110
-
111
-
112
-
113
-
114
-
115
-
116
-
117
-
118
-
119
-
120
-
121
-
122
-
123
-
124
-
125
-
126
-
127
-
128
-
129
-
130
-
131
-
132
-
133
-
134
-
135
-
136
-
137
-
138
-
139
-
140
-
141
-
142
-
143
-
144
-
145
-
146
-
147
-
148
-
149
-
150
-
151
 |
 |
