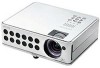
Toshiba TDP-D1-US Owners Manual - Page 8
Names of each part on the control panel and remote control, Names of the connection terminals
 |
View all Toshiba TDP-D1-US manuals
Add to My Manuals
Save this manual to your list of manuals |
Page 8 highlights
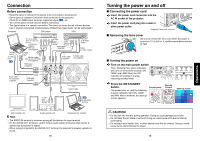
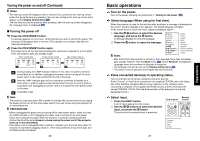
Names of each part on the control panel and remote control Control Panel (10) (9) (8) (7) ON LAMP TEMP FAN ON/STANDBY (1) (6) VOL.- MENU INPUT (2) (5) VOL.+ (4) AUTO KEYSTONE (3) AUTO SET Caution Label Remote Control Laser emitter Remote control transmitter (15) (24) Laser Warning (1) (11) (4) (16) ON/STANDBY CALL MUTE LASER FREEZE AUTO AUTO KEYSTONE SET PAGE DOWN PAGE UP (23) (12) (3) (17) (18) CLICK L-CLI (19) (13) (14) (5) CK R- DRAG RESIZE INPUT RESIZE OFF INPUT VOL.- MENU VOL.+ (20) (21) (22) (2) (6) Caution - use of controls or adjustments or performance of procedures other than those specified herein may result in hazardous radiation exposure. Name (1) ON/STANDBY button (2) INPUT button (3) AUTO SET button (4) AUTO KEYSTONE button (5) MENU button (6) Selection button (7) FAN indicator (8) TEMP indicator (9) LAMP indicator (10) ON indicator (11) MUTE button (12) FREEZE button (13) RESIZE button (14) RESIZE OFF button (15) CALL button (16) PAGE DOWN button (17) PAGE UP button : Main Function : Turns the power on/off (standby) p.19 : Selects input p.21 : Sets up image and mode p.23 : Adjusts keystone (trapezoidal distortion) p.24 : Displays menus and makes selections p.27 : Menu selections and adjustments, etc. p.27 : Displays cooling fan mode p.20 p.33 : Lights when internal temperature too high p.33 : Displays lamp mode p.20 : Displays whether power is on or off p.19 : Cuts off the picture and sound temporarily p.24 : Pauses image p.25 : Enlarges picture size p.25 : Turns off enlarged picture display p.25 : Displays the information on the screen p.26 : Canges page of file (Computer operation) p.30 : Canges page of file (Computer operation) p.30 14 (18) Pointer control button (19) L-CLICK button (20) R-CLICK button (21) DRAG button (22) INPUT + - button (23) LASER button (24) Laser indicator : Moves mouce pointer (Computer operation) p.30 : L-click of mouse (Computer operation) p.30 : R-click of mouse (Computer operation) p.30 : DRAG of mouse (Computer operation) p.30 : Changes input source in order p.21 : Displays laser point : Lights when laser point displaying Notes • For the remainder of this manual, buttons are referred to as follows: Selection button ⇒ ; MENU button ⇒ Names of the connection terminals (3) (4) (5) (6) COMPUTER IN (1) (2) AUDIO IN VIDEO S-VIDEO AUDIO OUT USB CONTROL MONITOR OUT (8) (7) (1) COMPUTER IN terminal Input RGB signal from a computer or other source, or a component video signal (Y/PB/ PR) from video equipment. (2) MONITOR OUT terminal Connect to a computer display, etc. (3) AUDIO IN terminal Input audio signals from a computer or video equipment. (4) AUDIO OUT terminal Outputs audio signals adjusted volume by a projector (5) VIDEO terminal Input video signals from video equipment. (6) S-VIDEO terminal Input S video signals from video equipment. (7) CONTROL terminal When operating the projector via a computer, connect this to the controlling computer's RS-232C port. p.38 (8) USB terminal Connect to a computer's USB port when using the remote-control mouse function. p.30 15 Preparations
-
 1
1 -
2
-
 3
3 -
 4
4 -
 5
5 -
 6
6 -
 7
7 -
 8
8 -
 9
9 -
 10
10 -
 11
11 -
 12
12 -
 13
13 -
14
-
15
-
16
-
17
-
18
-
19
-
20
 |
 |
