Toshiba TDP-T95 User Manual - Page 15
Using handy features
 |
View all Toshiba TDP-T95 manuals
Add to My Manuals
Save this manual to your list of manuals |
Page 15 highlights
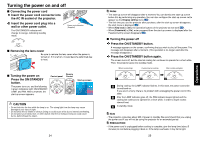
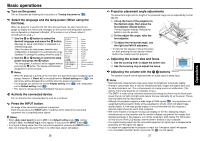
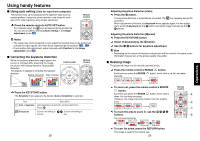
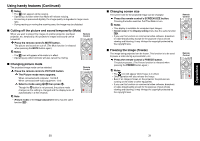
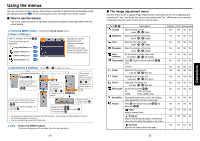
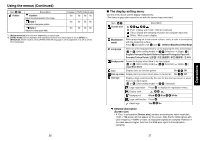
Using handy features ■ Using auto setting (Only for input from computer) This function sets up the projector to the optimum state such as sampling phase, frequency, screen position, and clamp for each type of the input signal by using simple operations. Press the remote control's AUTO SET button. For computer input, the icon will appear during processing. You can set as well by selecting [Auto setting] in the Image adjustment menu p.35 . Remote Control Notes • The image may not be projected or auto adjustment/setting may not be performed correctly for input signals other than those supported by the projector p.50 , p.51 . • If auto setting fails adjustment, adjust manually with [Position] in the Image adjustment menu p.35 . ■ Correcting the keystone distortion When the projector placement angle against the screen is changed while projecting the image, the picture will undergo keystone (trapezoidal) distortion. This projector is capable of correcting this keystone distortion. Before correction After correction Control panel Remote Control 1 Press the KEYSTONE button. The Keystone menu appears. By default, [Auto v-keystone] is selected. Item Description Auto v-keystone Automatically corrects the vertical distortion. Press . V-keystone Screen shrinking at bottom Screen shrinking at top 28 Adjusting Keystone distortion [Auto] 2 Press the button. The keystone distortion is automatically corrected. The icon appears during this correction. When adjustment is finished, the Keystone menu appears again. For fine adjustment, select [V-keystone] by the button and adjust image manually by the buttons. Adjusting Keystone distortion [Manual] 1 Press the KEYSTONE button. 2 Select [V-keystone] by the button. 3 Use the buttons for keystone adjustment. Note • Depending on the amount of keystone adjustment and the content of images, some information may be lost, or the picture quality may suffer. ■ Resizing image The projected image can be resized (zoomed in/out). 1 Press the remote control's RESIZE button. Each time you press the RESIZE pressing. button, zoom ratio is up. You can keep 2 To zoom out, press the remote control's RESIZE button. Each time you press the RESIZE button, zoom ratio is down. You can keep pressing. (However, the image cannot be smaller than the original size.) Remote Control 3 To move the area to zoom in, use the buttons. You can keep pressing. 4 To reset the zoom, press the RETURN button. The image is reset to the original size. 29 Operations
-
 1
1 -
2
-
3
-
4
-
5
-
6
-
7
-
8
-
9
-
 10
10 -
 11
11 -
 12
12 -
 13
13 -
 14
14 -
 15
15 -
 16
16 -
 17
17 -
 18
18 -
 19
19 -
 20
20 -
21
-
22
-
23
-
24
-
25
-
26
-
27
-
28
 |
 |
