Toshiba TLP-S71U User Manual - Page 19
Using the document camera Continued
 |
View all Toshiba TLP-S71U manuals
Add to My Manuals
Save this manual to your list of manuals |
Page 19 highlights
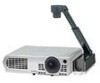
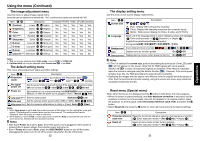
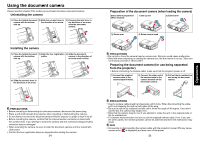
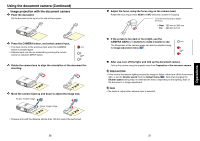
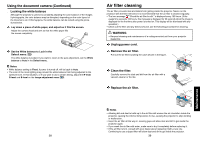
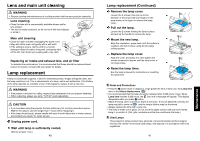
Using the document camera (Continued) s Image projection with the document camera 1 Place the document. Set the document at the top of or the side of the projector. 2 Press the CAMERA button, and select camera input. • The input returns to the previous input when the CAMERA button is pressed again. • Camera input can also be selected by pressing the remote control or camera's INPUT button. 3 Rotate the camera lens to align the orientation of the document for shooting. 4 Move the camera head up and down to adjust the image size. Farther: Smaller image Closer: Larger image • Closeup shot with the distance shorter than 100 mm cannot be performed. 36 5 Adjust the focus using the focus ring on the camera head Rotate the focus ring to either NEAR or FAR, whichever is better in focusing. Turn the focusing ring to adjust the focus. • Near : 100 mm to 300 mm Far : 300 mm to 5 m 6 If the screen is too dark or too bright, use the CAMERA GAIN (+/-) buttons to make it easier to see. The Sharpness of the camera image can also be adjusted using the Image adjustment menu p.32 . 7 After use, turn off the light, and fold up the document camera. Fold up the camera using the opposite order from Preparation of the document camera. PRECAUTION • If the room's fluorescent lighting causes the image to flicker, either turn off the fluorescent light, or set the Shutter speed from the Default menu p.32 . Note that changing the Shutter speed setting may not eliminate the flicker, depending on the lighting, state of the document, or image adjustment. Note • No audio is output when camera input is selected. 37 Operations
-
 1
1 -
2
-
3
-
4
-
5
-
6
-
7
-
8
-
9
-
10
-
11
-
12
-
13
-
 14
14 -
 15
15 -
 16
16 -
 17
17 -
 18
18 -
 19
19 -
 20
20 -
 21
21 -
 22
22 -
 23
23 -
 24
24 -
25
-
26
 |
 |
