Toshiba Tecra A11 PTSE1A-00M005 Users Manual AU/NZ - Page 97
eSATA External Serial ATA, Disconnecting the USB floppy diskette drive, Connecting the eSATA device
 |
View all Toshiba Tecra A11 PTSE1A-00M005 manuals
Add to My Manuals
Save this manual to your list of manuals |
Page 97 highlights
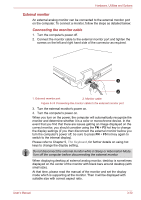
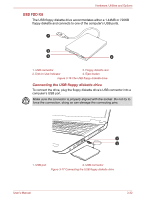
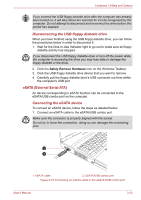
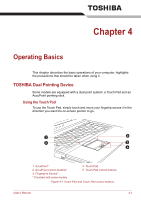
Hardware, Utilities and Options If you connect the USB floppy diskette drive after the computer has already been turned on, it will take about ten seconds for it to be recognized by the computer. Do not attempt to disconnect and reconnect the drive before this period has elapsed. Disconnecting the USB floppy diskette drive When you have finished using the USB floppy diskette drive, you can follow the procedures below in order to disconnect it: 1. Wait for the Disk-In-Use Indicator light to go out to make sure all floppy diskette activity has stopped. If you disconnect the USB floppy diskette drive or turn off the power while the computer is accessing the drive you may lose data or damage the floppy diskette or the drive. 2. Click the Safely Remove Hardware icon on the Windows Taskbar. 3. Click the USB floppy diskette drive device that you want to remove. 4. Carefully pull the floppy diskette drive's USB connector out from within the computer's USB port. eSATA (External Serial ATA) An device corresponding to eSATA function can be connected to the eSATA/USB combo port on the computer. Connecting the eSATA device To connect an eSATA device, follow the steps as detailed below: 1. Connect an eSATA cable to the eSATA/USB combo port. Make sure the connector is properly aligned with the socket. Do not try to force the connection, doing so can damage the connecting pins. 2 1 1. eSATA cable 2. eSATA/USB combo port Figure 3-18 Connecting an eSATA cable to the eSATA/USB combo port User's Manual 3-33
-
 1
1 -
2
-
3
-
4
-
5
-
6
-
7
-
8
-
9
-
10
-
11
-
12
-
13
-
14
-
15
-
16
-
17
-
18
-
19
-
20
-
21
-
22
-
23
-
24
-
25
-
26
-
27
-
28
-
29
-
30
-
31
-
32
-
33
-
34
-
35
-
36
-
37
-
38
-
39
-
40
-
41
-
42
-
43
-
44
-
45
-
46
-
47
-
48
-
49
-
50
-
51
-
52
-
53
-
54
-
55
-
56
-
57
-
58
-
59
-
60
-
61
-
62
-
63
-
64
-
65
-
66
-
67
-
68
-
69
-
70
-
71
-
72
-
73
-
74
-
75
-
76
-
77
-
78
-
79
-
80
-
81
-
82
-
83
-
84
-
85
-
86
-
87
-
88
-
89
-
90
-
91
-
 92
92 -
 93
93 -
 94
94 -
 95
95 -
 96
96 -
 97
97 -
 98
98 -
 99
99 -
 100
100 -
 101
101 -
 102
102 -
103
-
104
-
105
-
106
-
107
-
108
-
109
-
110
-
111
-
112
-
113
-
114
-
115
-
116
-
117
-
118
-
119
-
120
-
121
-
122
-
123
-
124
-
125
-
126
-
127
-
128
-
129
-
130
-
131
-
132
-
133
-
134
-
135
-
136
-
137
-
138
-
139
-
140
-
141
-
142
-
143
-
144
-
145
-
146
-
147
-
148
-
149
-
150
-
151
-
152
-
153
-
154
-
155
-
156
-
157
-
158
-
159
-
160
-
161
-
162
-
163
-
164
-
165
-
166
-
167
-
168
-
169
-
170
-
171
-
172
-
173
-
174
-
175
-
176
-
177
-
178
-
179
-
180
-
181
-
182
-
183
-
184
-
185
-
186
-
187
-
188
-
189
-
190
-
191
-
192
-
193
-
194
-
195
-
196
-
197
-
198
-
199
-
200
-
201
-
202
-
203
-
204
-
205
-
206
-
207
-
208
-
209
-
210
-
211
-
212
-
213
-
214
-
215
-
216
-
217
-
218
-
219
-
220
-
221
-
222
-
223
-
224
-
225
-
226
-
227
-
228
-
229
-
230
-
231
-
232
-
233
-
234
-
235
-
236
-
237
-
238
 |
 |