Toshiba Tecra A8-EZ8413 Resource Guide for Tecra A8 - Page 25
Adding memory (optional), Installing a memory module
 |
View all Toshiba Tecra A8-EZ8413 manuals
Add to My Manuals
Save this manual to your list of manuals |
Page 25 highlights
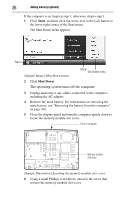
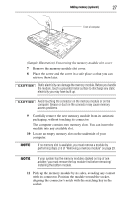
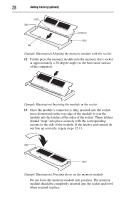
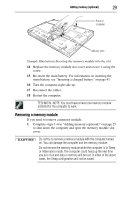
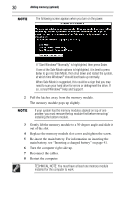
Adding memory (optional) 25 To connect a USB printer to your computer: 1 Connect the printer cable to the printer and then connect the other end to one of the computer's USB ports. 2 Plug the printer's power cable into a live electrical outlet. See your printer documentation for additional configuration steps, or see "Setting up a printer" in the electronic user's guide. Adding memory (optional) HINT: To purchase additional memory modules, see the accessories information packaged with your system or visit accessories.toshiba.com. Your computer comes with enough memory to run most of today's popular applications. You may want to increase the computer's memory if you use complex software or process large amounts of data. Installing a memory module Memory modules can be installed in the memory module slots on the base of the computer. You will need a small Phillips screwdriver for this procedure. If the computer has been running recently, the memory module may be hot. The surrounding area may also be hot. Allow the module to cool to room temperature before replacing it. Avoid touching the cover, the module, and the surrounding area before they have cooled. Failure to follow these directions could result in minor bodily injury. To avoid damaging the computer's screws, use a small Phillips screwdriver that is in good condition. Installing a memory module with the computer's power on may damage the computer, the module, or both. The computer has two memory module slots - Slot A and Slot B. You can install one or two memory modules. Before you install or remove a memory module, turn off the computer using the Start menu (as shown in step 1 below). If you install or remove a memory module while the computer is in Standby or Hibernation mode, data will be lost.
-
 1
1 -
2
-
3
-
4
-
5
-
6
-
7
-
8
-
9
-
10
-
11
-
12
-
13
-
14
-
15
-
16
-
17
-
18
-
19
-
 20
20 -
 21
21 -
 22
22 -
 23
23 -
 24
24 -
 25
25 -
 26
26 -
 27
27 -
 28
28 -
 29
29 -
 30
30 -
31
-
32
-
33
-
34
-
35
-
36
-
37
-
38
-
39
-
40
-
41
-
42
-
43
-
44
-
45
-
46
-
47
-
48
-
49
-
50
-
51
-
52
 |
 |