Toshiba Tecra M11 PTME0C-01K002 Users Manual Canada; English - Page 92
TOSHIBA Express Port Replicator, Safely Remove Hardware and Eject Media
 |
View all Toshiba Tecra M11 PTME0C-01K002 manuals
Add to My Manuals
Save this manual to your list of manuals |
Page 92 highlights
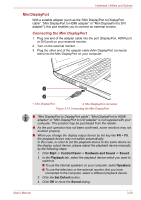
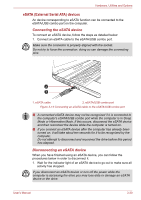
Hardware, Utilities and Options 2. Click the Safely Remove Hardware and Eject Media icon on the Windows Taskbar. 3. Click an eSATA device that you want to remove. 4. Carefully pull an eSATA device's eSATA/USB combo connector out from within the computer's eSATA/USB combo port. TOSHIBA Express Port Replicator In addition to the ports available on the computer, the TOSHIBA Express Port Replicator also provides several kinds of ports. The TOSHIBA Express Port Replicator connects directly to the docking interface on the underside of the computer. The AC adaptor connects the TOSHIBA Express Port Replicator to a power source. The computer must be configured properly before connecting to a LAN. Logging onto a LAN using the computer's default settings could cause a malfunction in LAN operation. Check with your LAN administrator regarding set-up procedures. ■ You must connect the AC adaptor before you connect to a TOSHIBA Express Port Replicator. ■ When a TOSHIBA Express Port Replicator is connected to the computer, you can not use the following computer's ports: LAN jack, DC IN 15V jack and External monitor port. ■ When connecting an AC Adaptor to the TOSHIBA Express Port Replicator, use only the AC Adaptor included with TOSHIBA Express Port Replicator. Do not use the computer's AC Adaptor. The following ports are available on the TOSHIBA Express Port Replicator. ■ RJ45 LAN jack ■ External monitor port ■ DC IN 15V jack ■ Security lock slot ■ Universal Serial Bus 2.0 port (four) ■ DVI port ■ As the port operation of all DVI (Digital Visual Interface) monitors has not been confirmed, some DVI monitors may not function properly. ■ Set the TOSHIBA Express Port Replicator's Slide Adjuster to SLIDE position #2 when connecting this computer to the TOSHIBA Express Port Replicator. Refer to the TOSHIBA Express Port Replicator User's Manual for more details on connection methods. User's Manual 3-31
-
 1
1 -
2
-
3
-
4
-
5
-
6
-
7
-
8
-
9
-
10
-
11
-
12
-
13
-
14
-
15
-
16
-
17
-
18
-
19
-
20
-
21
-
22
-
23
-
24
-
25
-
26
-
27
-
28
-
29
-
30
-
31
-
32
-
33
-
34
-
35
-
36
-
37
-
38
-
39
-
40
-
41
-
42
-
43
-
44
-
45
-
46
-
47
-
48
-
49
-
50
-
51
-
52
-
53
-
54
-
55
-
56
-
57
-
58
-
59
-
60
-
61
-
62
-
63
-
64
-
65
-
66
-
67
-
68
-
69
-
70
-
71
-
72
-
73
-
74
-
75
-
76
-
77
-
78
-
79
-
80
-
81
-
82
-
83
-
84
-
85
-
86
-
 87
87 -
 88
88 -
 89
89 -
 90
90 -
 91
91 -
 92
92 -
 93
93 -
 94
94 -
 95
95 -
 96
96 -
 97
97 -
98
-
99
-
100
-
101
-
102
-
103
-
104
-
105
-
106
-
107
-
108
-
109
-
110
-
111
-
112
-
113
-
114
-
115
-
116
-
117
-
118
-
119
-
120
-
121
-
122
-
123
-
124
-
125
-
126
-
127
-
128
-
129
-
130
-
131
-
132
-
133
-
134
-
135
-
136
-
137
-
138
-
139
-
140
-
141
-
142
-
143
-
144
-
145
-
146
-
147
-
148
-
149
-
150
-
151
-
152
-
153
-
154
-
155
-
156
-
157
-
158
-
159
-
160
-
161
-
162
-
163
-
164
-
165
-
166
-
167
-
168
-
169
-
170
-
171
-
172
-
173
-
174
-
175
-
176
-
177
-
178
-
179
-
180
-
181
-
182
-
183
-
184
-
185
-
186
-
187
-
188
-
189
-
190
-
191
-
192
-
193
-
194
-
195
-
196
-
197
-
198
-
199
-
200
-
201
-
202
-
203
-
204
-
205
-
206
-
207
-
208
-
209
-
210
-
211
-
212
-
213
-
214
 |
 |