Toshiba Tecra R840 PT429C-00201D Users Manual Canada; English - Page 79
Optical disc drives, Formats
 |
View all Toshiba Tecra R840 PT429C-00201D manuals
Add to My Manuals
Save this manual to your list of manuals |
Page 79 highlights
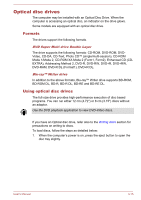
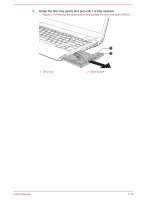
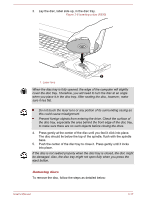
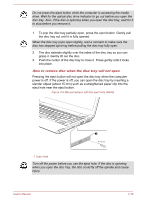
Optical disc drives The computer may be installed with an Optical Disc Drive. When the computer is accessing an optical disc, an indicator on the drive glows. Some models are equipped with an optical disc drive. Formats The drives support the following formats. DVD Super Multi drive Double Layer The drive supports the following formats: CD-ROM, DVD-ROM, DVDVideo, CD-DA, CD-Text, Photo CD™ (single/multi-session), CD-ROM Mode 1/Mode 2, CD-ROM XA Mode 2 (Form1, Form2), Enhanced CD (CDEXTRA), Addressing Method 2, DVD-R, DVD-RW, DVD+R, DVD+RW, DVD-RAM, DVD-R DL (Format1), DVD+R DL. Blu-ray™ Writer drive In addition to the above formats, Blu-ray™ Writer drive supports BD-ROM, BD-ROM DL, BD-R, BD-R DL, BD-RE and BD-RE DL. Using optical disc drives The full-size drive provides high-performance execution of disc based programs. You can run either 12 cm (4.72") or 8 cm (3.15") discs without an adaptor. Use the DVD playback application to view DVD-Video discs. If you have an Optical disc drive, refer also to the Writing discs section for precautions on writing to discs. To load discs, follow the steps as detailed below: 1. When the computer's power is on, press the eject button to open the disc tray slightly. User's Manual 3-15
-
 1
1 -
2
-
3
-
4
-
5
-
6
-
7
-
8
-
9
-
10
-
11
-
12
-
13
-
14
-
15
-
16
-
17
-
18
-
19
-
20
-
21
-
22
-
23
-
24
-
25
-
26
-
27
-
28
-
29
-
30
-
31
-
32
-
33
-
34
-
35
-
36
-
37
-
38
-
39
-
40
-
41
-
42
-
43
-
44
-
45
-
46
-
47
-
48
-
49
-
50
-
51
-
52
-
53
-
54
-
55
-
56
-
57
-
58
-
59
-
60
-
61
-
62
-
63
-
64
-
65
-
66
-
67
-
68
-
69
-
70
-
71
-
72
-
73
-
 74
74 -
 75
75 -
 76
76 -
 77
77 -
 78
78 -
 79
79 -
 80
80 -
 81
81 -
 82
82 -
 83
83 -
 84
84 -
85
-
86
-
87
-
88
-
89
-
90
-
91
-
92
-
93
-
94
-
95
-
96
-
97
-
98
-
99
-
100
-
101
-
102
-
103
-
104
-
105
-
106
-
107
-
108
-
109
-
110
-
111
-
112
-
113
-
114
-
115
-
116
-
117
-
118
-
119
-
120
-
121
-
122
-
123
-
124
-
125
-
126
-
127
-
128
-
129
-
130
-
131
-
132
-
133
-
134
-
135
-
136
-
137
-
138
-
139
-
140
-
141
-
142
-
143
-
144
-
145
-
146
-
147
-
148
-
149
-
150
-
151
-
152
-
153
-
154
-
155
-
156
-
157
-
158
-
159
-
160
-
161
-
162
-
163
-
164
-
165
-
166
-
167
-
168
-
169
-
170
-
171
-
172
-
173
-
174
-
175
-
176
-
177
-
178
-
179
-
180
-
181
-
182
-
183
-
184
-
185
-
186
-
187
-
188
-
189
-
190
-
191
-
192
-
193
-
194
-
195
-
196
-
197
-
198
-
199
-
200
-
201
-
202
-
203
-
204
-
205
-
206
-
207
-
208
-
209
-
210
-
211
-
212
-
213
 |
 |