Tripp Lite AVRX750UF Owner's Manual for AVR Series UPS Systems 932976 - Page 6
Optional Installation, Installation - battery backup
 |
View all Tripp Lite AVRX750UF manuals
Add to My Manuals
Save this manual to your list of manuals |
Page 6 highlights
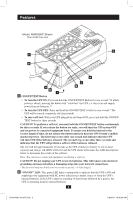
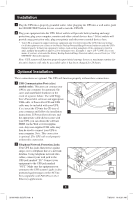
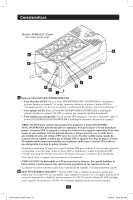
Installation 1 Plug the UPS into a properly grounded outlet. After plugging the UPS into a wall outlet, push the ON/OFF/TEST button for one second to turn the UPS ON. 2 Plug your equipment into the UPS: Select outlets will provide battery backup and surge protection; plug your computer, monitor and other critical devices here.* Select outlets will provide surge protection only; plug your printer and other non-essential devices here. * Your UPS is designed to support electronic equipment only. You will overload the UPS if the total wattage for all the equipment you connect to the Battery Backup Protected/Surge Protected outlets exceeds the UPS's Output Capacity. To find your equipment's wattage, look on their nameplates. If the equipment is listed in amps, multiply the number of amps by 230 to determine watts. (Example: 1 amp × 230 = 230W). If you are unsure if you have overloaded the Battery Backup Protected/Surge Protected outlets, run a self-test (see "ON/ OFF/TEST" Button description). Note: UPS system will function properly upon initial startup; however, maximum runtime for the unit's battery will only be accessible after it has been charged for 24 hours. Optional Installation These connections are optional. The UPS will function properly without these connections. 1 USB Communication Port (select models only): This port can connect your UPS to any computer for automatic file saves and unattended shutdown in the event of a power failure. Use with Tripp Lite's PowerAlert software and appropriate USB cable. A PowerAlert CD and USB cable may be included with your UPS; if so, insert the CD into the CD tray of your computer and follow the installation 1 instructions. If PowerAlert software and the appropriate cable did not come with your UPS, you can obtain the software FREE via the Web at www.tripplite. com. Any user-supplied USB cable may then be used to connect your UPS to your computer. Note: This connection is optional. The UPS will work properly without this connection. 2 Telephone/Network Protection Jacks: Your UPS has jacks that protect against surges over a telephone line or a network dataline. Using telephone network data cables, connect your wall jack to the UPS jack marked "IN." Connect your equipment to the UPS jack marked "OUT." Make sure the equipment you connect to the UPS system's jacks is also protected against surges on the AC line. Not compatible with PoE (Power Over 2 Ethernet) applications. 6 201001098 93-2976.indb 6 7/8/2010 10:42:31 AM
-
 1
1 -
 2
2 -
 3
3 -
 4
4 -
 5
5 -
 6
6 -
 7
7 -
 8
8 -
 9
9 -
 10
10 -
 11
11 -
 12
12 -
13
-
14
-
15
-
16
-
17
-
18
-
19
-
20
-
21
-
22
-
23
-
24
-
25
-
26
-
27
-
28
-
29
-
30
-
31
-
32
-
33
-
34
-
35
-
36
-
37
-
38
-
39
-
40
 |
 |
