Tripp Lite B1194X4 Owners Manual for HDMI Matrix Switches English - Page 9
Troubleshooting
 |
View all Tripp Lite B1194X4 manuals
Add to My Manuals
Save this manual to your list of manuals |
Page 9 highlights
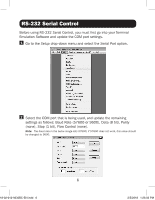
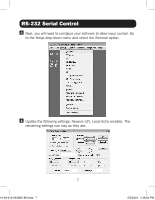
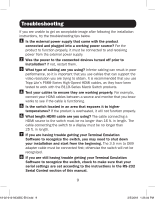
Troubleshooting If you are unable to get an acceptable image after following the installation instructions, try the troubleshooting tips below. 1 Is the external power supply that came with the product connected and plugged into a working power source? For the product to function properly, it must be connected to and receiving power from the external power supply. 2 Was the power to the connected devices turned off prior to installation? If not, restart them. 3 What type of cabling are you using? Inferior cabling can result in poor performance, so it is important that you use cables that can support the video resolution you are trying to obtain. It is recommended that you use Tripp Lite's P568-Series High-Speed HDMI cables, as they have been tested to work with the B119-Series Matrix Switch products. 4 Test your cables to ensure they are working properly. For example, connect your HDMI cables between a source and monitor that you know works to see if the cable is functioning. 5 Is the switch located in an area that exposes it to higher temperatures? If the product is overheated, it will not function properly. 6 What length HDMI cable are you using? The cable connecting a HDMI source to the switch must be no longer than 16 ft. in length. The cable connecting the switch to a display must be no longer than 25 ft. in length. 7 If you are having trouble getting your Terminal Emulation Software to recognize the switch, you may need to shut down your installation and start from the beginning. The 3.5 mm to DB9 adapter cable must be connected first; otherwise the switch will not be recognized. 8 If you are still having trouble getting your Terminal Emulation Software to recognize the switch, check to make sure that your serial settings are set according to the instructions in the RS-232 Serial Control section of this manual. 9 18-02-012-9332BC-EN.indd 9 2/5/2018 1:26:04 PM
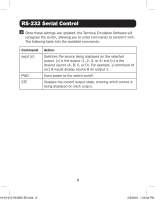
-
 1
1 -
2
-
3
-
 4
4 -
 5
5 -
 6
6 -
 7
7 -
 8
8 -
 9
9 -
 10
10 -
 11
11 -
 12
12
 |
 |