Tripp Lite CSC16ACW Owners Manual - Page 5
Setup, Wall Mounting, Desktop/Floor Placement
 |
View all Tripp Lite CSC16ACW manuals
Add to My Manuals
Save this manual to your list of manuals |
Page 5 highlights
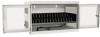
4. Setup 4.4 Door Locks The split doors contain a lock that is accessible with the included keys. 5. Wall Mounting For wall mounting, you will need: • Level • Appropriate tools for wall mounting • Appropriate hardware for wall mounting (not included) Warning: Do not attempt to mount the charging station to the wall with any personal electronic devices inside. There are 4 keyhole cutouts on the charging station cabinet's rear panel. Each keyhole can accommodate an M5 or 3/16" bolt. Each of the keyhole sets are centered 16" apart horizontally and 12" vertically (see the corresponding model diagram for exact keyhole locations). Using a level and tape measure, measure to position your mounting areas precisely. Use appropriate fasteners (not included) to secure the charging station to the wall. Note: The charging station must be installed by a qualified technician. Use suitable mounting means when installing to cinder block, concrete, drywall or wood studs. Warning: The supporting surface must be able to safely support the combined load of the charging station, equipment stored and all attached hardware and components. See Section 7. Specifications for more information on your model's weight and dimensions. 16" 12" 6. Desktop/Floor Placement WARNING: For desktop and floor applications, always install the charging station in a structurally sound area with a level surface that is able to bear the weight of the charging station, all equipment that will be installed in the charging station and any other enclosures and/or equipment that will be installed nearby. Never attempt to lift or install the charging station without adequate help. See Section 7. Specifications for more information on the charging station's rated load capacity. Note: The mounting brackets that shipped with unit can also be used to secure the charging station to a desktop surface 5
-
 1
1 -
 2
2 -
 3
3 -
 4
4 -
 5
5 -
 6
6 -
 7
7 -
 8
8 -
 9
9 -
 10
10 -
 11
11 -
12
-
13
-
14
-
15
-
16
-
17
-
18
-
19
-
20
 |
 |
