Tripp Lite SMART3000RM2U Owner's Manual for SmartPro 2U Rack UPS 933088 - Page 18
Battery Replacement
 |
View all Tripp Lite SMART3000RM2U manuals
Add to My Manuals
Save this manual to your list of manuals |
Page 18 highlights
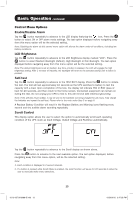
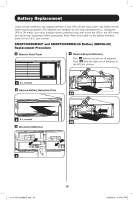
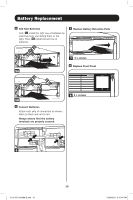
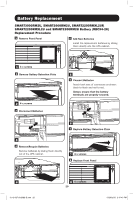
Battery Replacement Under normal conditions, the original batteries in your UPS will last many years. See Safety section before replacing batteries. The batteries are designed for hot-swap replacement (i.e. leaving the UPS in ON mode), but some qualified service personnel may wish to put the UPS in the OFF mode and disconnect equipment before proceeding. Note: Refer to the label on the battery retention plate for the R.B.C. part number. SMART3000RM2UP and SMART3000RMXL2U Battery (RBC58-2U) Replacement Procedure 1 Remove Front Panel 4 Remove/Recycle Batteries First, 4A remove the left row of batteries. Then, 4B slide the right row of batteries to the left and remove. 1 4 x screws 2 Remove Battery Retention Plate 4A 2 4 x screws 4B 3 Disconnect Batteries 3 18 12-12-037-93-3088-B.indb 18 12/26/2012 3:47:37 PM
-
 1
1 -
2
-
3
-
4
-
5
-
6
-
7
-
8
-
9
-
10
-
11
-
12
-
 13
13 -
 14
14 -
 15
15 -
 16
16 -
 17
17 -
 18
18 -
 19
19 -
 20
20 -
 21
21 -
 22
22 -
 23
23 -
24
-
25
-
26
-
27
-
28
-
29
-
30
-
31
-
32
-
33
-
34
-
35
-
36
-
37
-
38
-
39
-
40
-
41
-
42
-
43
-
44
-
45
-
46
-
47
-
48
-
49
-
50
-
51
-
52
-
53
-
54
-
55
-
56
-
57
-
58
-
59
-
60
-
61
-
62
-
63
-
64
 |
 |
