Tripp Lite SU750XL Owner's Manual for SmartOnline UPS 932470 - Page 11
Troubleshooting, Battery Replacement - tripplite
 |
View all Tripp Lite SU750XL manuals
Add to My Manuals
Save this manual to your list of manuals |
Page 11 highlights
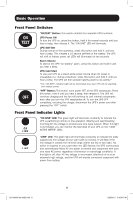
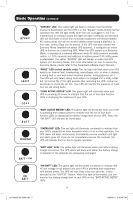
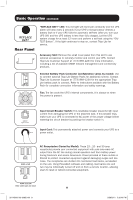
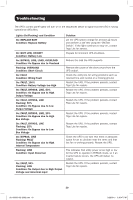
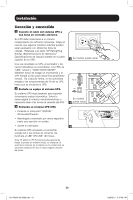
Troubleshooting continued Lights (On/Flashing) and Condition Solution On: FAULT Flashing: LINE, 50% Condition: No Output due to Low Output Voltage and Abnormal Input Restart the UPS. If the problem persists, contact Tripp Lite for repairs. On: FAULT, 25% Flashing: LINE Condition: No Output due to High Bus Voltage and Abnormal Input Restart the UPS. If the problem persists, contact Tripp Lite for repairs. On: FAULT Flashing: LINE, 25% Condition: No Output due to Low Bus Voltage and Abnormal Input Restart the UPS. If the problem persists, contact Tripp Lite for repairs. Flashing: LINE, FAULT Condition: No Output due to High Internal Temperature and Abnormal Input Check the UPS to be sure that there is adequate space for air to circulate near the vents and that the fan is working properly. Restart the UPS. If the problem persists, contact Tripp Lite for repairs. Battery Replacement 1 Your model may differ. 2 Your model may differ. Battery Replacement Door: Under normal conditions, the original battery in your UPS will last several years. Battery replacement should be performed only by qualified service personnel. Refer to "Battery Warnings" in the Safety section. Should your UPS require battery replacement, visit Tripp Lite on the Web at www.tripplite.com/support/ battery/index.cfm to locate the specific replacement battery for your UPS. 1 Carefully pull the front panel away from the UPS. Place front panel on top of the unit. Remove the battery support bar. 2 Remove old batteries. Carefully pull the batteries from the UPS and disconnect them. 3 Connect new batteries. Connect the new batteries in exactly the same manner as the old ones: positive (red) connectors together and negative (black) connectors together. Carefully push batteries back into the UPS. 4 Reassemble UPS. Reinstall the battery support bar and replace the front panel. 3 Your model may differ. 11 201102091 93-3092.indb 11 3/29/2011 5:37:00 PM
-
 1
1 -
2
-
3
-
4
-
5
-
 6
6 -
 7
7 -
 8
8 -
 9
9 -
 10
10 -
 11
11 -
 12
12 -
 13
13 -
 14
14 -
 15
15 -
 16
16 -
17
-
18
-
19
-
20
-
21
-
22
-
23
-
24
-
25
-
26
-
27
-
28
-
29
-
30
-
31
-
32
-
33
-
34
-
35
-
36
-
37
-
38
-
39
-
40
 |
 |
