Troy-Bilt TB225 Operation Manual - Page 10
Maintenance And Repair - cultivator parts
 |
View all Troy-Bilt TB225 manuals
Add to My Manuals
Save this manual to your list of manuals |
Page 10 highlights
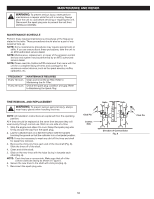
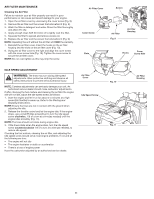
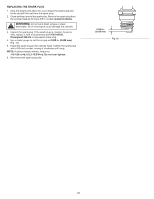
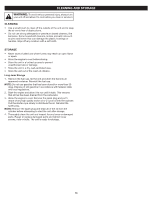
MAINTENANCE AND REPAIR WARNING: To prevent serious injury, never perform maintenance or repairs while the unit is running. Always allow the unit to cool before servicing or repairing the unit. Disconnect the spark plug wire to prevent the unit from starting accidentally. MAINTENANCE SCHEDULE Perform these required maintenance procedures at the frequency stated in the table. These procedures should also be a part of any seasonal tune-up. NOTE: Some maintenance procedures may require special tools or skills. If you are unsure about these procedures, take the unit to an MTD authorized service dealer. NOTE: Maintenance, replacement, or repair of the emission control devices and system may be performed by an MTD authorized service dealer. NOTE: Please read the California/EPA statement that came with the unit for a complete listing of terms and coverage for the emissions control devices, such as the spark arrestor, muffler, carburetor, etc. FREQUENCY Every 10 hours Every 25 hours MAINTENANCE REQUIRED Clean and re-oil the air filter. Refer to Maintaining the Air Filter. Check the spark plug condition and gap. Refer to Maintaining the Spark Plug. TINE REMOVAL AND REPLACEMENT WARNING: To prevent serious personal injury, always wear heavy gloves when handling the tines. NOTE: All installation instructions are explained from the operating position. All 4 tines should be replaced at the same time because they will wear evenly through normal use. Work on one side at a time. 1. Stop the engine and allow it to cool. Grasp the spark plug wire firmly and pull the cap from the spark plug. 2. Lay the cultivator back on a flat level surface with the handles touching the ground so that the cultivator is in a horizontal position. NOTE: It may be necessary to wash any dirt off the tines and shaft for easier tine removal. 3. Remove the click pins from each end of the tine shaft (Fig. 8). Slide the tines off of the shaft. 4. Clean and oil the shaft. 5. Slide on the new tines with the hubs facing in towards each other (Fig. 8). NOTE: Each tine has a convex side. Make sure that all of the convex sides are facing as shown in Figure 8. 6. Secure the new tines to the shaft with click pins (Fig. 8). 7. Reconnect the spark plug wire. Click Pin Convex Side Hubs Hubs Click Pin Direction of Convex Sides Fig. 8 10
-
 1
1 -
2
-
3
-
4
-
 5
5 -
 6
6 -
 7
7 -
 8
8 -
 9
9 -
 10
10 -
 11
11 -
 12
12 -
 13
13 -
 14
14 -
 15
15 -
16
-
17
-
18
-
19
-
20
-
21
-
22
-
23
-
24
-
25
-
26
-
27
-
28
-
29
-
30
-
31
-
32
 |
 |