Turtle Beach Ear Force X11 User's Guide - Page 2
Using Standard A/V Cables - amplified stereo headset with chat
 |
View all Turtle Beach Ear Force X11 manuals
Add to My Manuals
Save this manual to your list of manuals |
Page 2 highlights
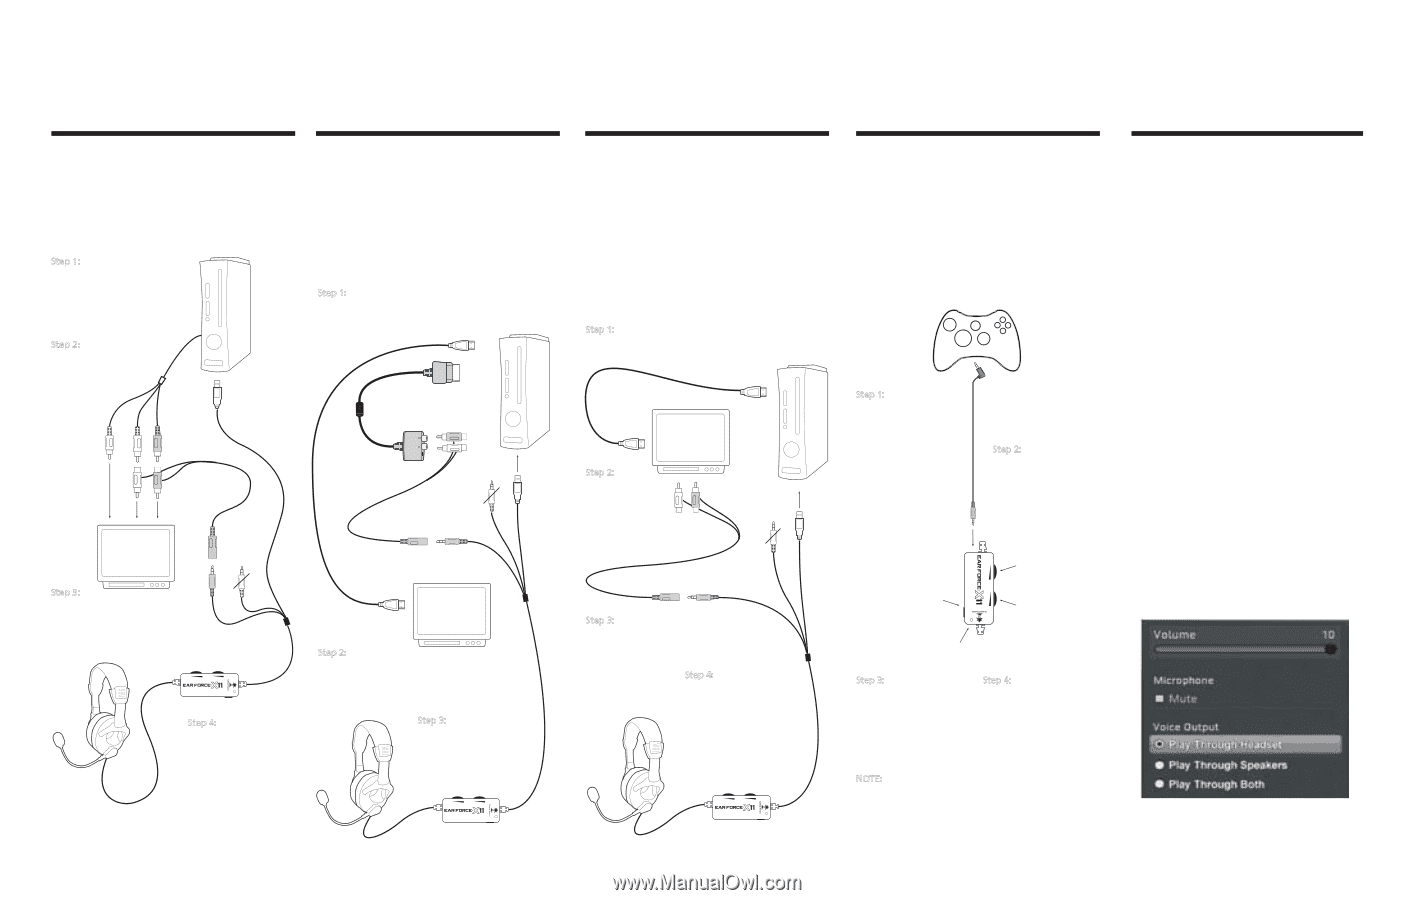
Connecting to the XBOX Using Standard A/V Cables Connecting to the XBOX ��� Using an HDMI Cable Alternate Connection When Using HDMI Connecting the Microphone Use the included cables to connect the headset, XBOX and TV (or sound system) as shown. This will allow you to hear the XBOX with either the TV or the X�� headset. Step �: Connect the XBOX audio cables (red/white) to the X�� splitter cable (red/white). Step �: Connect the X�� splitter cable (red/white) to TV audio input (red/white). USB/Power Video (yellow) Audio (red/white) Splitter cable (red/white) Pink mic plug (PC use TV only) Step �: Connect the X�� green audio plug to the green input on the splitter cable. Green audio plug Step �: Insert the X�� USB/Power connector to an open USB port on the XBOX. These instructions show how to set up the X�� with the optional XBOX HD AV cable (must be purchased separately) and an HDMI cable for HD video. The standard AV cable with composite video is replaced by the HDMI video connection. Step �: Connect the HDMI cable from the XBOX to your TV. Connect the XBOX HD AV cable to the XBOX. XBOX HD AV Cable Splitter cable (red/white) Pink mic plug (PC use only) USB /Power Green audio plug HDMI Video HDTV Step �: Connect the X�� audio cable (green) to the splitter cable input (green). Step �: Insert the X�� USB/Power connector to an open USB port on the XBOX. If your HD TV has stereo RCA output jacks, you can connect the X�� to these RCA jacks rather than the XBOX RCA plugs. Note that on some TVs, the TV volume control might also adjust the output level to these RCA jacks. So if you turn down the volume on the TV speakers, you would also turn down the volume on the headset. Step �: Connect the HDMI cable from the XBOX to the HD TV. The X�� microphone may be used to communicate with other players during XBOX LIVE multi-player gaming sessions. Use the included talkback cable to connect the headset to the XBOX controller. XBOX controller HDTV HDMI Step �: Connect the X�� audio cable (red/white) to the stereo audio outputs (red/white) on your HD TV. Splitter cable (red/white) Pink mic plug (PC use only) Step �: Connect the X�� audio cable (green) to the splitter cable input (green). Green audio plug Step �: Insert the X�� USB/Power connector to an open USB port on the XBOX. Step �: Insert the right angle plug into the mic input jack on the XBOX controller. Step �: Insert the straight plug into the "XBOX jack" on the X�� amplifier. USB /Power XBOX Jack (Mic output to XBOX controller) Mic Mute Switch Game Audio Volume Chat Volume Amplifier LED Step �: Use the Chat Volume control on the amplifier to adjust the level of XBOX Live chat voices from other players. Step �: Use the Game Volume control on the amplifier to adjust the level of game sounds. NOTE: Use the Mic Mute switch on the X�� amplifier to prevent your voice from being heard by other players. Configuring the XBOX Settings XBOX LIVE is a subscription feature offered with the XBOX ��� that lets you communicate with other players via the internet. The X�� headset lets you communicate with other players during XBOX LIVE multiplayer gaming sessions. To use this feature, connect the headset to the XBOX controller as described in the previous section, then configure the XBOX LIVE feature as described below. �. Press the center XBOX button on your controller to bring up the Dashboard. �. Navigate right to the Settings tab and scroll down to "Preferences" from the menu. Press the "A" button. �. On the Preferences screen, select the "Voice" option and Press "A". �. Select the "Play Through Headset" option and set the Volume to ��.
-
 1
1 -
 2
2
 |
 |