Turtle Beach Ear Force Z6A User's Guide - Page 7
Step 1, Step 2, Step 3, Step 4, Step 5, Sound Card Settings - headphones
 |
View all Turtle Beach Ear Force Z6A manuals
Add to My Manuals
Save this manual to your list of manuals |
Page 7 highlights
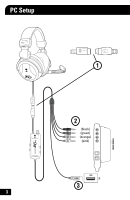
Step 1: Align the multi-pin amplifier and headphone connectors as shown and carefully insert them together, making sure not to force the pins. Step 2: Connect the four colored audio jacks to the corresponding inputs and outputs on your sound card, as indicated in the table below: JACK Center/Sub Mic Front Surround COLOR Orange Pink Green Black Step 3: Insert the USB connector into any USB port on your PC. Step 4: Select the microphone as the recording source in your sound card's control panel. Then adjust the volume level and sensitivity for adequate response when speaking into the mic. Step 5: Set your sound card for 5.1 channel output and adjust the volume settings to a comfortable level. Sound Card Settings: Most sound cards allow setting the output levels and speaker configurations via software that is accessed from the Windows® Control Panel. Please refer to your sound card documentation for instructions on setting up the outputs for 5.1 audio to properly drive the headphone speakers. Also, note that some sound cards may have the bass and center channels reversed, which will cause an apparent decrease in bass response. This can often be corrected with a setting in the sound card control software. 4
-
 1
1 -
 2
2 -
 3
3 -
 4
4 -
 5
5 -
 6
6 -
 7
7 -
 8
8 -
 9
9 -
 10
10 -
 11
11 -
 12
12 -
13
-
14
-
15
-
16
-
17
-
18
-
19
-
20
 |
 |
