Uniden BC350A English Owners Manual - Page 5
Installing the BC350A, For Home Use, For Home Use Desktop Installation - frequencies
 |
View all Uniden BC350A manuals
Add to My Manuals
Save this manual to your list of manuals |
Page 5 highlights
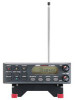
Installing the BC350A For Home Use (Desktop Installation) 1. Insert the DC plug end of the AC Adapter into the DC 13.8V jack on the rear panel. 2. Plug the AC Adapter into a standard 120V AC wall outlet. Warning: Do not plug the AC Adapter into an outlet controlled by a wall switch. This could cause scanner memory loss. 3. Plug the Telescoping Antenna into the ANT connector. Extend the antenna to its full height. For frequencies higher than 406 MHz, shortening the antenna may improve the reception. 4. Use the desktop stand for a better viewing and operating angle. Helpful Hints • If strong interference or electrical noise is received, relocate the scanner or its antenna away from the source. • If you are operating the scanner in a fringe area or need to improve reception, use an optional antenna designed for multi-band coverage. (You can purchase this type of antenna at a local electronics store.) • If the optional antenna has no cable, use 50-70 ohm coaxial cable for lead-in. A mating plug may be necessary for the optional antennas. For Mobile Use (In-Car Installation) Mounting the Radio 1. Select an ideal location in your vehicle to mount the BC350A. Avoid a location that could interfere with your driving. In a passenger car, the ideal location is underneath the dashboard on the passenger side. 2. Use the BC350A mounting bracket as a template for marking the location of the mounting screws. Note: If there are screws already holding the dashboard, you can use the same screw holes to mount the bracket. 3. Drill the necessary holes and secure the mounting bracket in place using the screws provided. 4. Mount the radio to the bracket only after the wiring has been connected to the rear panel. 5
-
 1
1 -
 2
2 -
 3
3 -
 4
4 -
 5
5 -
 6
6 -
 7
7 -
 8
8 -
 9
9 -
 10
10 -
 11
11 -
12
-
13
-
14
-
15
-
16
-
17
-
18
-
19
-
20
-
21
-
22
-
23
-
24
-
25
-
26
-
27
-
28
 |
 |
