Uniden D1481 English Owner Manual - Page 3
Getting Started
 |
View all Uniden D1481 manuals
Add to My Manuals
Save this manual to your list of manuals |
Page 3 highlights
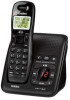
Getting Started Installing Your Phone Charge the Battery 1. Unpack the handset, battery pack, and battery cover. If you need to remove the cover, press in on the notch and slide the cover down and off. 2. Line up the battery connector with the jack inside the handset; the connector only fits one way. 3. Push the connector in until it clicks into place; tug gently on the wires to make sure the battery is securely connected. 4. Replace the battery cover and slide it into place. 5. Use an AC adapter to connect the power jack on the base to a regular indoor (120V AC) power outlet. 6. Place the handset in the base with the display facing forward. If the display doesn't light up, reseat the handset or connect the base to a different outlet. ## Charge the handset completely (about 15 hours) before using. Connect the Telephone Cord 1. Use the telephone cord to connect the TEL LINE jack on the base to a standard telephone wall jack. ## If the display says Check Tel Line, check the connection between the base and the phone jack. 2. If you are mounting the phone on the wall, place the mounting slots (on the rear of the base) over the pins on the wall plate; slide the base down to lock it into place. Test the Connection Make a quick test call. Pick up the handset and press Talk/flash. (Press End to hang up.) xxIf there's a lot of noise, check for interference (see p. 13). xxIf you keep hearing a dial tone, change to pulse dialing (see below). Changing from Tone to Pulse Dialing Your phone uses tone dialing by default. If your phone company uses pulse dialing, you need to change your phone's dial mode. 1. Press Menu/select and select Global Setup. 2. Select Dial Mode then Pulse. You'll hear a confirmation tone. To send DTMF tones during a call (e.g., for an automated response system), * press to temporarily switch to tone dialing. When you hang up, the phone automatically returns to pulse dialing. English - 3
-
 1
1 -
 2
2 -
 3
3 -
 4
4 -
 5
5 -
 6
6 -
 7
7 -
 8
8 -
 9
9 -
10
-
11
-
12
-
13
-
14
-
15
-
16
-
17
-
18
 |
 |
