Uniden TRU9488 English Owners Manual - Page 27
Assign a personal ring tone for this entry Personal Ring Handset only.
 |
UPC - 050633260432
View all Uniden TRU9488 manuals
Add to My Manuals
Save this manual to your list of manuals |
Page 27 highlights
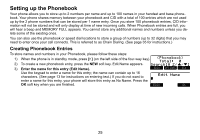
4) Enter the number for this entry (Edit Number 1).. Once you have stored a name, EDIT NUMBER1 appears next. Use the number Edit Number1 keypad, [right] or [left] on the four-way function key, or the DELETE soft key to 。 enter the phone number 1; the phone number can contain up to 32 digits. If you need the phone to pause between digits when it's dialing (for example, to enter an BACK OK extension or an access code), press [redial/pause] on the handset or the PAUSE soft key on the base to insert a two-second pause. You will see a P in the display. You can also use more than one pause together if two seconds is not long enough. Each pause counts as one digit. Press the OK soft key when you are finished. . EDIT NUMBER2 appears next. Use the same procedure when entering the phone number 1 to enter the phone number 2. Press the OK soft key when you are finished. 5) Assign a personal ring tone for this entry (Personal Ring) (Handset only).. Personal Ring You can attach a personalized ring tone to each phonebook entry; the phone will N o S e l e c t i o n use this ring tone when this person calls. Move the cursor to highlight one of the F l i c k e r 20 different ring tone options. As you highlight each ring tone, you will hear a BACK DELETE OK sample of that tone. When you hear the ring tone you want to use, press the OK soft key. If you do not want to use a personal ring tone for this phonebook entry, select the NO SELECTION option, and the phone will use your standard ring tone setting. 6) Assign this entry to a Speed Dial number (Speed Dial).. Speed Dial Your phone has 10 speed dial numbers, 0 to 9. Move the cursor to select the No Selection speed dial number you want to assign to this phonebook entry, and press the OK S P D 1 : E m p t y soft key. Select NO SELECTION if you do not want to assign this entry to a speed BACK DELETE OK dial number. 7) You will hear a tone confirming that the new phonebook entry has been stored, and DONE! appears in the display. Note: When the shared memory is full, the oldest Caller ID message is overwritten. 26
-
 1
1 -
2
-
3
-
4
-
5
-
6
-
7
-
8
-
9
-
10
-
11
-
12
-
13
-
14
-
15
-
16
-
17
-
18
-
19
-
20
-
21
-
 22
22 -
 23
23 -
 24
24 -
 25
25 -
 26
26 -
 27
27 -
 28
28 -
 29
29 -
 30
30 -
 31
31 -
 32
32 -
33
-
34
-
35
-
36
-
37
-
38
-
39
-
40
-
41
-
42
-
43
-
44
-
45
-
46
-
47
-
48
-
49
-
50
-
51
-
52
-
53
-
54
-
55
-
56
-
57
-
58
-
59
-
60
-
61
-
62
-
63
-
64
-
65
-
66
-
67
-
68
-
69
-
70
-
71
-
72
-
73
-
74
-
75
-
76
-
77
-
78
-
79
-
80
-
81
-
82
-
83
-
84
 |
 |