Uniden UDR444 English Owner's Manual - Page 7
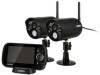
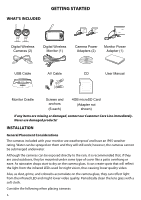
Installing Your Monitor, Installing the Camera - video surveillance system
 |
View all Uniden UDR444 manuals
Add to My Manuals
Save this manual to your list of manuals |
Page 7 highlights
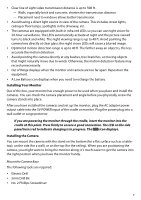
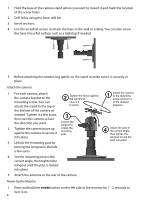
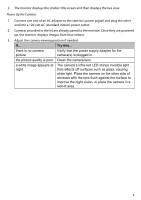
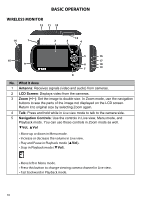
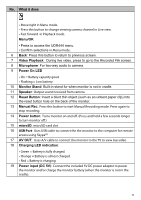
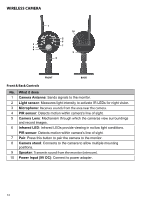
•• Clear line of sight video transmission distance is up to 500 ft. -- Walls, especially brick and concrete, shorten the transmission distance. -- Placement next to windows allows better transmission. •• Avoid having a direct light source in view of the camera. This includes street lights, ceiling or floor lamps, spotlights in the driveway, etc. •• The cameras are equipped with built-in infra-red LEDs so you can use night vision for 24-hour surveillance. The LEDs automatically activate at night and the picture viewed turns to black and white. The night viewing range is up to 40 ft. Avoid pointing the camera lens directly at clear glass; the night vision LEDs will cause a blurred image. •• Optimized motion detection range is up to 40 ft. The farther away an object is, the less accurate the motion detection. •• Avoid pointing the camera directly at any bushes, tree branches, or moving objects that might naturally move due to winds. Otherwise, the motion detection feature may record unnecessarily. •• Out of Range displays when the monitor and camera are too far apart. Reposition the equipment. •• A Low Battery icon displays when you need to recharge the battery. Installing Your Monitor Out of the box, your monitor has enough power to be used when you place and install the cameras. You can check the camera placement and angle before you physically screw the camera stands into place. After you have installed the cameras and set up the monitor, plug the AC adapter power output cable into the 5V POWER input of the cradle or monitor. Plug the power plug into a wall outlet or surge protector. If you are powering the monitor through the cradle, insert the monitor into the cradle at this point. Press firmly to ensure a good connection. The LED on the side panel turns red to indicate charging is in progress. The icon displays. Installing the Camera You can mount the camera with the stand on the bottom (for a flat surface such as a tabletop), on the side (for a wall), or on the top (for the ceiling). When you are positioning the camera, you might want to bring the monitor along; it's much easier to get the camera into the right position when you have the monitor handy. Mount the Camera Base The following tools are required: •• Electric Drill •• 5mm Drill Bit •• No. 2 Phillips Screwdriver 7
-
 1
1 -
 2
2 -
 3
3 -
 4
4 -
 5
5 -
 6
6 -
 7
7 -
 8
8 -
 9
9 -
 10
10 -
 11
11 -
 12
12 -
13
-
14
-
15
-
16
-
17
-
18
-
19
-
20
-
21
-
22
-
23
-
24
-
25
-
26
-
27
-
28
-
29
-
30
-
31
-
32
-
33
-
34
-
35
-
36
-
37
-
38
 |
 |