Vaddio EasyMic Ceiling MicPOD EasyTalk Solutions Manual - Page 18
Diagram, Very Big Conference Table with Overflow Seating
 |
View all Vaddio EasyMic Ceiling MicPOD manuals
Add to My Manuals
Save this manual to your list of manuals |
Page 18 highlights
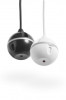
EasyTalk USB Solutions Diagram: Very Big Conference Table with Overflow Seating System with one (1) EasyUSB Mixer/Amp, two (2) EasyMic Ceiling MicPODs* four (4) EasyTalk Ceiling Speakers 2-Lines wired series) and a ClearVIEW HD-USB PTZ Camera *Note the distance requirement is still 4' between the speakers and the microphones. Typical Ceiling Installation Arrangements: Recommended ceiling installation arrangements for the EasyMic Ceiling MicPOD and ceiling speakers are depicted in the above diagrams. Installation guidelines for ceiling applications include: Maintain a minimum ceiling microphone to ceiling speaker distance separation of 4' (1.22m) for optimum performance. Avoid placing ceiling microphone arrays next to HVAC systems, lighting ballasts, projectors and any other devices that are noise generating sources. Remember that large amplitude noise sources will be amplified by the microphones. Avoid hanging microphone heads in direct path of HVAC blowers within the room. Excessive air flow over the microphone elements will reduce intelligibility of the audio. The EasyMic Ceiling MicPOD was designed to allow the installer to adjust the hanging height of the microphone element from the ceiling. A 36" drop cable is tethered to microphone array head and a strain relief clamp has been incorporated into the interface module. This allows the hanging length of the ceiling array to be variable with excess cable being secured with the strain relief clamp. For optimum performance, the microphone array should be as close to the participants as possible. However, a minimum hanging height of 12" away from the ceiling should be maintained. Vaddio EasyUSB Solutions - Document Number 342-0449 Rev C Page 18 of 48
-
 1
1 -
2
-
3
-
4
-
5
-
6
-
7
-
8
-
9
-
10
-
11
-
12
-
 13
13 -
 14
14 -
 15
15 -
 16
16 -
 17
17 -
 18
18 -
 19
19 -
 20
20 -
 21
21 -
 22
22 -
 23
23 -
24
-
25
-
26
-
27
-
28
-
29
-
30
-
31
-
32
-
33
-
34
-
35
-
36
-
37
-
38
-
39
-
40
-
41
-
42
-
43
-
44
-
45
-
46
-
47
-
48
 |
 |
