Vaddio PCC Premier PCC Premier Integrators Complete Guide - Page 12
Camera Controller Basics, Powering Up the Cameras and Controller, Ensuring Compatibility
 |
View all Vaddio PCC Premier manuals
Add to My Manuals
Save this manual to your list of manuals |
Page 12 highlights
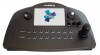
Integrator's Complete Guide to PCC Premier Precision Camera Controller Camera Controller Basics This section covers powering the camera controller and making sure it is able to communicate with its cameras. It also includes a quick tour of the console and information on accessing the controller's web interface. Powering Up the Cameras and Controller Power up all cameras to be used with the controller. When you connect the PCC Premier to the network for the first time, it will only identify supported cameras that are directly connected via RS-232. After the Address Book has been set up, the controller tries to establish contact with all IP-connected cameras in its address book when it powers up from standby mode. Ensuring Compatibility The camera controller may be unable to communicate with its Vaddio cameras if their firmware is out of date. When you set up the camera controller or update its firmware, also check for firmware updates on all the cameras it needs to control. This keeps them playing nicely together. Control Console Features The console provides basic address book and other functions in addition to camera control. Touch-Panel Display The touch-panel provides: n Access to the address book, to set up and select camera groups n Access to camera presets and CCU scenes n CCU scene setup n Network information for the controller n Camera motor calibration routines n One-touch standby (controller and selected cameras) Focus Knob Press the focus knob to switch between manual and auto-focus modes. In manual focus mode, turn the knob to adjust the focus. Menu Knob This knob provides precision in setting slider controls. Dial to the desired setting, then press the menu knob to save it. You can also use the Menu knob to navigate the touch-panel screens and some of the controls. Camera Select Buttons The camera select buttons allow you to select the camera to work with, from the two active camera groups (Control A and Control B). During normal operation, the buttons are illuminated if they are mapped to cameras in the active groups. If a button is not lit, it means one of these things: n No camera is connected to the RS-232 port assigned to this button. n No IP-connected camera has been assigned to this button. 8
-
 1
1 -
2
-
3
-
4
-
5
-
6
-
 7
7 -
 8
8 -
 9
9 -
 10
10 -
 11
11 -
 12
12 -
 13
13 -
 14
14 -
 15
15 -
 16
16 -
 17
17 -
18
-
19
-
20
-
21
-
22
-
23
-
24
-
25
-
26
-
27
-
28
-
29
-
30
-
31
-
32
-
33
-
34
-
35
-
36
-
37
-
38
-
39
-
40
-
41
-
42
-
43
-
44
-
45
-
46
-
47
-
48
-
49
-
50
-
51
-
52
-
53
-
54
-
55
-
56
-
57
-
58
-
59
-
60
-
61
 |
 |
