Vantec NST-225MX-S3 Datasheet
Vantec NST-225MX-S3 - NexStar MX Manual
 |
View all Vantec NST-225MX-S3 manuals
Add to My Manuals
Save this manual to your list of manuals |
Vantec NST-225MX-S3 manual content summary:
- Vantec NST-225MX-S3 | Datasheet - Page 1
Installation Guide Guía de instalación Guide d'installation Installationsanleitung Guida all'installazione Dual 2.5" SATA 6Gb . Verificare i contenuti della confezione b 2. Release the four screws of the NexStar MX. then pull out the rear panel and tray Quite los cuatro tornillos y, - Vantec NST-225MX-S3 | Datasheet - Page 2
of these materials in any manner whatsoever without written permission is strictly forbidden. Printed in China Printed on Recycled Paper. Model: NST-225MX-S3 Copyright © 2015 Vantec Thermal Technologies. All Right Reserved. | All Registered Trademarks Belong To Their Respective Companies.
-
 1
1 -
 2
2
 |
 |

Installation Guide
Guía de instalación
Guide d'installation
Installationsanleitung
Guida all’installazione
安装指南
Dual 2.5” SATA 6Gb/s to USB 3.0 HDD/SSD RAID Enclosure
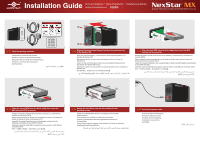
Secure the hard drive onto the drive caddy with the
provided screws.
5.
Asegure la unidad de disco duro en su armazón con los tornillos
proporcionados.
Fixez le lecteur sur le boîtier en utilisant les vis fournies.
Fixieren Sie die Festplatte mit den mitgelieferten Schrauben im
Laufwerkträger.
Fissare il disco rigido al supporto unità usando le viti fornite in dotazione.
用提供的螺丝将硬盘固定到硬盘盒上。
Place the first HDD onto the drive caddy then insert the HDD
into the SATA connector.
3.
Coloque la primera unidad de disco duro en su armazón y, a continuación, insértela en el
conector SATA.
Placez le premier lecteur de disque dur sur le boîtier du lecteur, puis insérez le lecteur de
disque dur dans le connecteur SATA.
Legen Sie die erste Festplatte in den Laufwerkträger, schieben Sie die Festplatte anschließend
in den SATA-Verbinder.
Collocare la prima unità HDD nel supporto unità ed inserire l’unità HDD nel connettore SATA.
将第一个硬盘放入硬盘盒,然后将其插入 SATA 连接器。
Place the second HDD onto the drive caddy then insert the
HDD into the SATA connector.
4.
Coloque la segunda unidad de disco duro en su armazón y, a continuación,
insértela en el conector SATA.
Placez le second lecteur de disque dur sur le boîtier du lecteur, puis insérez le
lecteur de disque dur dans le connecteur SATA.
Legen Sie die zweite Festplatte in den Laufwerkträger, schieben Sie die
Festplatte anschließend in den SATA-Verbinder.
Collocare la seconda unità HDD nel supporto unità ed inserire l’unità HDD nel
connettore SATA.
将第二个硬盘放入硬盘盒,然后将其插入 SATA 连接器。
Verify the package contents.
1.
Compruebe el contenido del paquete.
Vérifiez le contenu du paquet d’emballage.
Überprüfen Sie den Inhalt des Produktkartons.
Verificare i contenuti della confezione.
检查包装内物品。
Release the four screws then pull out the rear panel and tray
of the NexStar MX.
2.
Quite los cuatro tornillos y, a continuación, retire el panel posterior y la
bandeja de NexStar MX.
Dévissez les quatre vis puis retirez le panneau arrière et le tiroir du
NexStar MX
Lösen Sie die vier Schrauben, ziehen Sie anschließend Rückwand und
Schublade des NexStar MX heraus.
Allentare le quattro viti, poi estrarre il pannello posteriore ed il cassetto da
NexStar MX.
松开四颗螺丝,然后拉出NexStar MX的后面板和托盘。
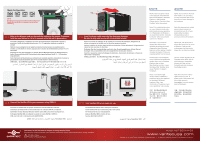
Connect the power cable.
6.
Conecte el cable de alimentación.
Branchez le câble de courant .
Schließen Sie die Netzleitung.
Connettere il cavo elettrico.
连接电源线。