Vantec NST-400MX-S3R Datasheet - Page 2
Vantec NST-400MX-S3R - NexStar MX Manual
 |
View all Vantec NST-400MX-S3R manuals
Add to My Manuals
Save this manual to your list of manuals |
Page 2 highlights
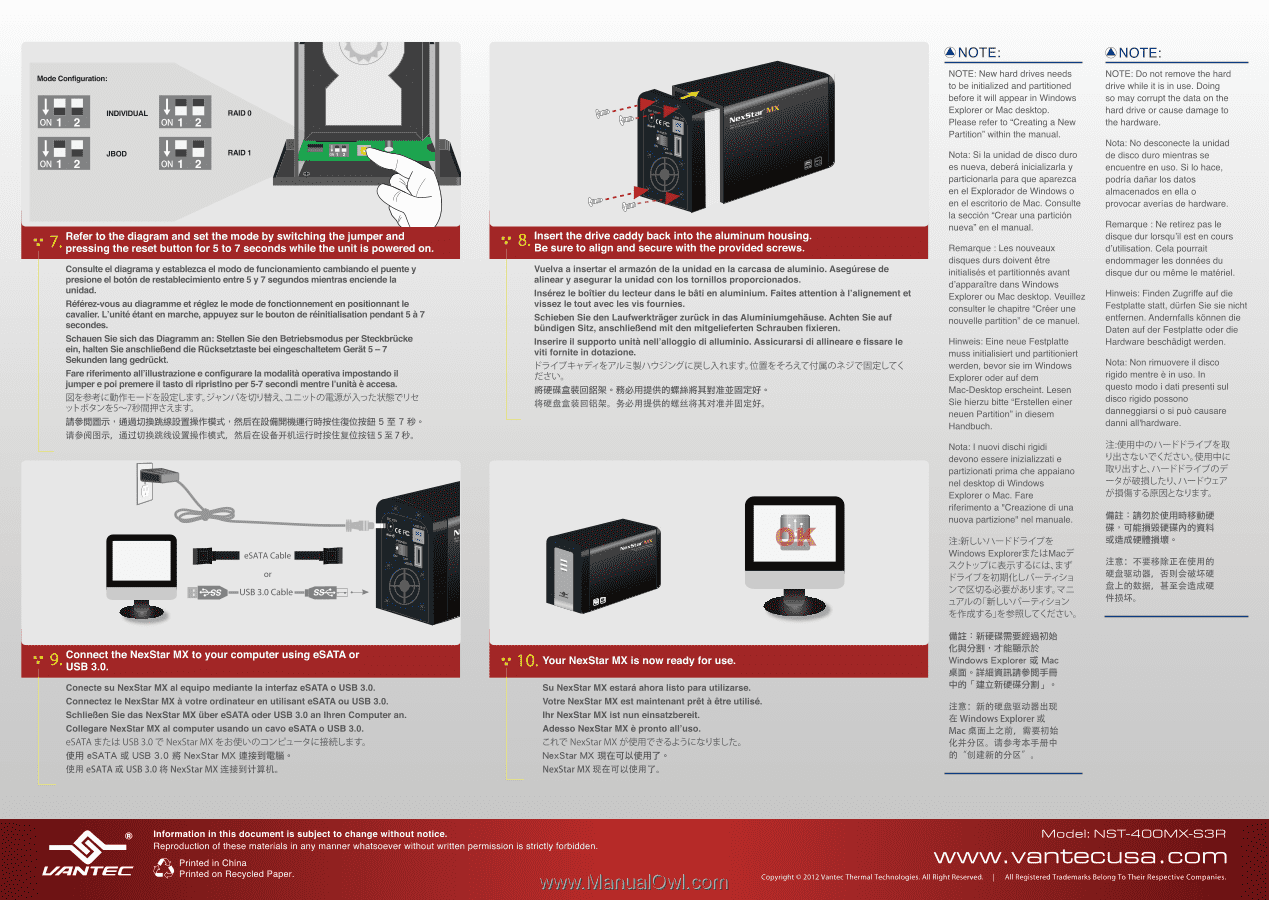
Mode Configuration: 1 N1 2 1 ON 1 2 'Jr.. INDIVIDUAL ON 1 2 JBOD 'Jr. ON 1 RAID 0 RAID 1 Refer to the diagram and set the mode by switching the jumper and 7. pressing the reset button for 5 to 7 seconds while the unit is powered on. Consulte el diagrama y establezca el modo de funcionamiento cambiando el puente y preslone el bot6n de restableclmlento entre 5 y 7 segundos mientras enclende la unklad. Referez-vous au diagramme et reglez le mode de fonctionnement en positionnant le cavalier. L'unke &ant en marche, appuyez sur le bouton de reinkialisation pendant 5 a 7 secondes. Schauen Sie sick des Diagramm an: Stellen Sie den Betriebsmodus per Stedcbriicke ein, halten Sie anschlieBend die ROckselztaste bei eingeschaltetem Gerrit 5 -7 Sekunden lang gedrOcIct. Fare riferimento e conflgurare la modallta operative Impostando II jumper e poi premere it tasto di ripristino per 5-7 secondi mentre Punka a accesa. 7 i-*51>t -5-7-VrIPPtcAIVO-. Mt0907-;..,a= l-a)ME/YA-DitedETUt EIPIEEIffc MILOVAMSEMPAftiliA fFSEiltiONINEZeiltiVEMIAIR 5 M 71' - MON 7T:. EMMEVIREViltiakA, fi&E4.1,e*3-FtilEi-i -lilattlEfilViEli5E70. 4illo eSATA Cable or USB 3.0 Cable-Ill=r Connect the NexStar MX to your computer using eSATA or USB 3.0. Conecte su NexStar MX al equipo mediante la interfaz eSATA o USB 3.0. Connectez le NexStar MX a votre ordinateur en utilisant eSATA ou USB 3.0. SchlieBen Sie des NexStar MX Ober eSATA oder USB 3.0 an Ihren Computer an. Collegare NexStar MX al computer usando un cavo eSATA o USB 3.0. eSATA USB 3.0 -C- s NexStar MX t -Sifft00) eSATA USB 3.0 NexStar MX WEENIE eSATA a USB 3.01$ NexStar MX Elf Eillitito .ovir ue, •CEBC I ~rM N a", R. Insert the drive caddy back into the aluminum housing. Be sure to align and secure with the provided screws. Vuelva a inserter el armazon de la unidad en la carcase de aluminio. Asegurese de alinear y asegurar la unidad con los tornillos proporcionados. Inserez le baler du lecteur dans le bati en aluminium. Faites attention a l'alignement et vissez le tout avec les vis fournies. Schleben Sle den Laufwerktrager zurOck In des Aluminiumgehause. Achten Sle auf bUndlgen Sitz, anschileBend mit den mltgelleferten Schrauben fixieren. Inserke it supporto unite nell'alloggio di alluminio. Assicurarsi di allineare e fissare le viti fornite in dotazione. tEz.t0. '', 47vViEEL-Atir.tfili -6A-Zi4lEa)*VT.Illt LT< iltliEiSEVMEN 141IMEAEHWil. OntitheLkaltkilt# go 10. Your NexStar MX is now ready for use. Su NexStar MX ester& ahora listo pare utilizarse. Votre NexStar MX est maintenant prat a etre utilise. Ihr NexStar MX ist nun einsatzbereit. Adesso NexStar MX é pronto all'uso. NexStar MX OftflrZ.k5" iErx 9 NexStar MX 3E47, 1cAlfiElElj7 NexStar MX EMTailEfliT. *NOTE: NOTE: New hard drives needs to be initialized and partitioned before it will appear in Windows Explorer or Mac desktop. Please refer to "Creating a New Partition" within the manual. Nota: Si la unidad de disco duro es nueva, debera inicializarla y particionarla pars qua aparezca en el Explorador de Windows o en el escritorio de Mac. Consulte la seccien "Crear una partici& nueva" en el manual. Remarque : Les nouveaux disques durs doivent etre initialises et partitionnes avant d'apparaffre dans Windows Explorer ou Mac desktop. Veuillez consulter le chapitre "Creer une nouvelle partition" de ce manuel. Hinweis: Eine neue Festplatte muss initialisiert and partitioniert werden, bevor sie im Windows Explorer oder auf dem Mac-Desktop erscheint. Lesen Sie hierzu bitte "Erstellen einer neuen Partition" in diesem Handbuch. Nota: I nuovi dischi rigidi devono essere inizializzati e partizionati prima the appaiano nel desktop di Windows Explorer o Mac. Fare riferimento a "Creazione di una nuova partizione" nel manuale. • - Windows Explorer n.:UMac - F.773r-tz/iTZic v" YeKt)J i6Mhx , 9 7= a7/1, 0)11Wl-t,, , t-WIRLT
-
 1
1 -
 2
2
 |
 |