Vantec UGT-CR900 User Guide - Page 1

Vantec UGT-CR900 - All-In-1 USB 2.0 Internal Card Reader Manual

Page 1 highlights

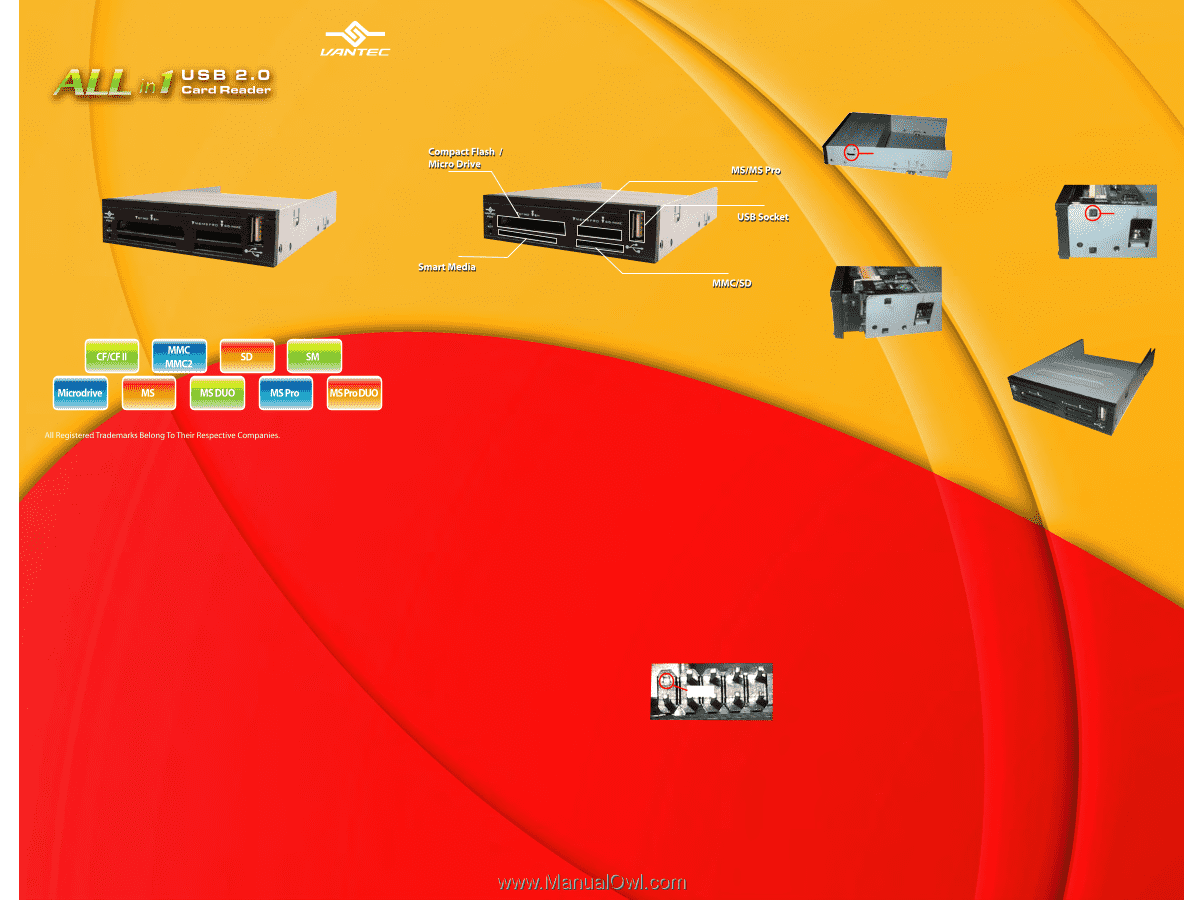
Feature Diagram 1 2 Changing the Faceplate 1) Unclip the top cover of the card reader. Gently pry the tabs if the tab cover will not come off. 2) Press the side tabs of the faceplate to release it from the base unit. This can be done with any pointed object. faceplate tab * For Compact Flash I/II and Microdrive cards, insert with label side facing up. * For SmartMedia cards, insert with contacts side facing up. * For Memory Stick, Memory Stick Pro, Memory Stick Duo, and Memory Stick Pro Duo cards, insert with contacts side facing down. * For MultiMedia Cards and Secure Digital cards, insert with contacts side facing up. 3. Snap the new cover in place so that the faceplate tabs snap into the holes on base unit. 4) Snap the top cover back in place such that the cover tabs snap into the holes on the base unit. 3 4 5 Installation WARNING: For Windows 98/ME/2000, you must install the drivers prior to installing the hardware! NOTE: Windows XP and MacOS users do NOT need to install any additional drivers. Driver Installation: If you are using Windows XP or MacOS, please skip to the Hardware Installation section on the next page. 1) Insert the included CD into your CD Rom drive. 2) Open Windows Explorer and double click on your CD Rom drive's icon. 3a) If you are using Windows 98 SE, open the "Win98se" folder and run "setup.exe." Please have your Windows 98 SE installation CD handy as you may need it for additional files. Please note that you may be required to reboot your system to complete the installation. 3b) If you are using Windows 2000, open the "Win2000" folder and run "setup.exe." Please note that you may be required to reboot your system to complete the installation. 4) Follow the onscreen prompts to complete the installation. 5) Once complete, remove the Driver's CD from your CD Rom drive and turn off your system. Installation (con't) Hardware Installation: If you are using Windows 98SE/ME/2000 please follow the steps under Driver Installation on the previous page first. 1) Make sure your computer has been turned off and remove any attached cables. 2) Open your computer case and locate an available 3.5" bay. 3) If the USB header cable is not attached to the card reader, connect it at this point. Align the connector such that the hole with no wires lines up with the no pin connection point with no pin. 4) Insert the Card Reader into the free 3.5" device bay such that the holes on the side align with the case. 5) Screw the Card Reader in place. 6) Connect the other end of the USB header cable to an unused USB header on your motherboard. Aligh the connector such that the hole with no wires lines up with the connection point with no pin (refer to above picture). 7) Recover your computer case and reconnect any cables that were previously removed. 8) Turn your computer back on. Using the Card Reader NOTE: The first time you use the card reader, Windows will detect the new hardware and automatically detect the drivers. 1) Once installed, you should now see 4 new drive letters appear under My Computer. Depending on which version of Windows you are using, the drive label may be "Removable Disk" or the actual drive type. 2) Insert your memory card into the appropriate drive slot. Please refer to the "Feature Diagram" if you are unsure which slot to use. 3) If the memory card has data on it or has been previously formatted in a format Windows can recognize, you should now see the drive label for the slot in use change to that of the memory card. 4) If the drive label does not change, you will have to try each new drive letter until you find your disk. This is because Windows automatically assigns drive letters for removable drives. 5) You can now read and write to the memory card as if it were a floppy disk. WARNING: Do NOT remove the memory card while data is being read or written to the card! Doing so may damage the card!

  • 1

Installation
Installation (con’t)
Using the Card Reader
1) Unclip the top cover of the card
reader.
Gently pry the tabs if the
cover will not come off.
2) Press the side tabs of the faceplate
to release it from the base unit.
This
can be done with any pointed object.
3. Snap the new cover in place so
that the faceplate tabs snap into
the holes on base unit.
4) Snap the top cover back in
place such that the cover
tabs snap into the holes on
the base unit.
* For Compact Flash I/II and Microdrive cards, insert with label
side facing up.
* For SmartMedia cards, insert with contacts side facing up.
* For Memory Stick, Memory Stick Pro, Memory Stick Duo, and
Memory Stick Pro Duo cards, insert with contacts side facing
down.
* For MultiMedia Cards and Secure Digital cards, insert with
contacts side facing up.
1
2
Feature Diagram
Feature Diagram
Changing the Faceplate
1) Unclip the top cover of the card
reader.
Gently pry the tabs if the
cover will not come off.
tab
2) Press the side tabs of the faceplate
to release it from the base unit.
This
can be done with any pointed object.
faceplate tab
3. Snap the new cover in place so
that the faceplate tabs snap into
the holes on base unit.
4) Snap the top cover back in
place such that the cover
tabs snap into the holes on
the base unit.
3
Installation
WARNING:
For Windows 98/ME/2000, you must install the
drivers prior to installing the hardware!
NOTE:
Windows XP and MacOS users do NOT need to install
any additional drivers.
Driver Installation:
If you are using Windows XP or MacOS, please skip to the Hardware
Installation section on the next page.
1) Insert the included CD into your CD Rom drive.
2) Open Windows Explorer and double click on your CD Rom
drive’s icon.
3a) If you are using Windows 98 SE, open the “Win98se” folder
and run “setup.exe.”
Please have your Windows 98 SE
installation CD handy as you may need it for additional files.
Please note that you may be required to reboot your system
to complete the installation.
3b) If you are using Windows 2000, open the “Win2000” folder
and run “setup.exe.”
Please note that you may be required
to reboot your system to complete the installation.
4) Follow the onscreen prompts to complete the installation.
5) Once complete, remove the Driver’s CD from your CD Rom
drive and turn off your system.
4
Installation (con’t)
Hardware Installation:
If you are using Windows 98SE/ME/2000 please follow the steps under
Driver Installation on the previous page first.
1) Make sure your computer has been turned off and remove
any attached cables.
2) Open your computer case and locate an available 3.5” bay.
3) If the USB header cable is not attached to the card reader,
connect it at this point.
Align the
connector such that the hole with
no wires lines up with the
connection point with no pin.
4) Insert the Card Reader into the free 3.5” device bay such
that the holes on the side align with the case.
5) Screw the Card Reader in place.
6) Connect the other end of the USB header cable to an
unused USB header on your motherboard.
Aligh the
connector such that the hole with no wires lines up with
the connection point with no pin (refer to above picture).
7) Recover your computer case and reconnect any cables
that were previously removed.
8) Turn your computer back on.
no pin
5
Using the Card Reader
NOTE:
The first time you use the card reader, Windows will detect
the new hardware and automatically detect the drivers.
1) Once installed, you should now see 4 new drive letters
appear under My Computer.
Depending on which version of
Windows you are using, the drive label may be “Removable
Disk” or the actual drive type.
2) Insert your memory card into the appropriate drive slot.
Please refer to the “Feature Diagram” if you are unsure
which slot to use.
3) If the memory card has data on it or has been previously
formatted in a format Windows can recognize, you should
now see the drive label for the slot in use change to that of
the memory card.
4) If the drive label does not change, you will have to try each
new drive letter until you find your disk.
This is because
Windows automatically assigns drive letters for removable
drives.
5) You can now read and write to the memory card as if it were
a floppy disk.
WARNING:
Do NOT remove the memory card while data is being
read or written to the card!
Doing so may damage the card!