ViewSonic N1750W User Manual - Page 11
Operating Instructions - remote
 |
View all ViewSonic N1750W manuals
Add to My Manuals
Save this manual to your list of manuals |
Page 11 highlights
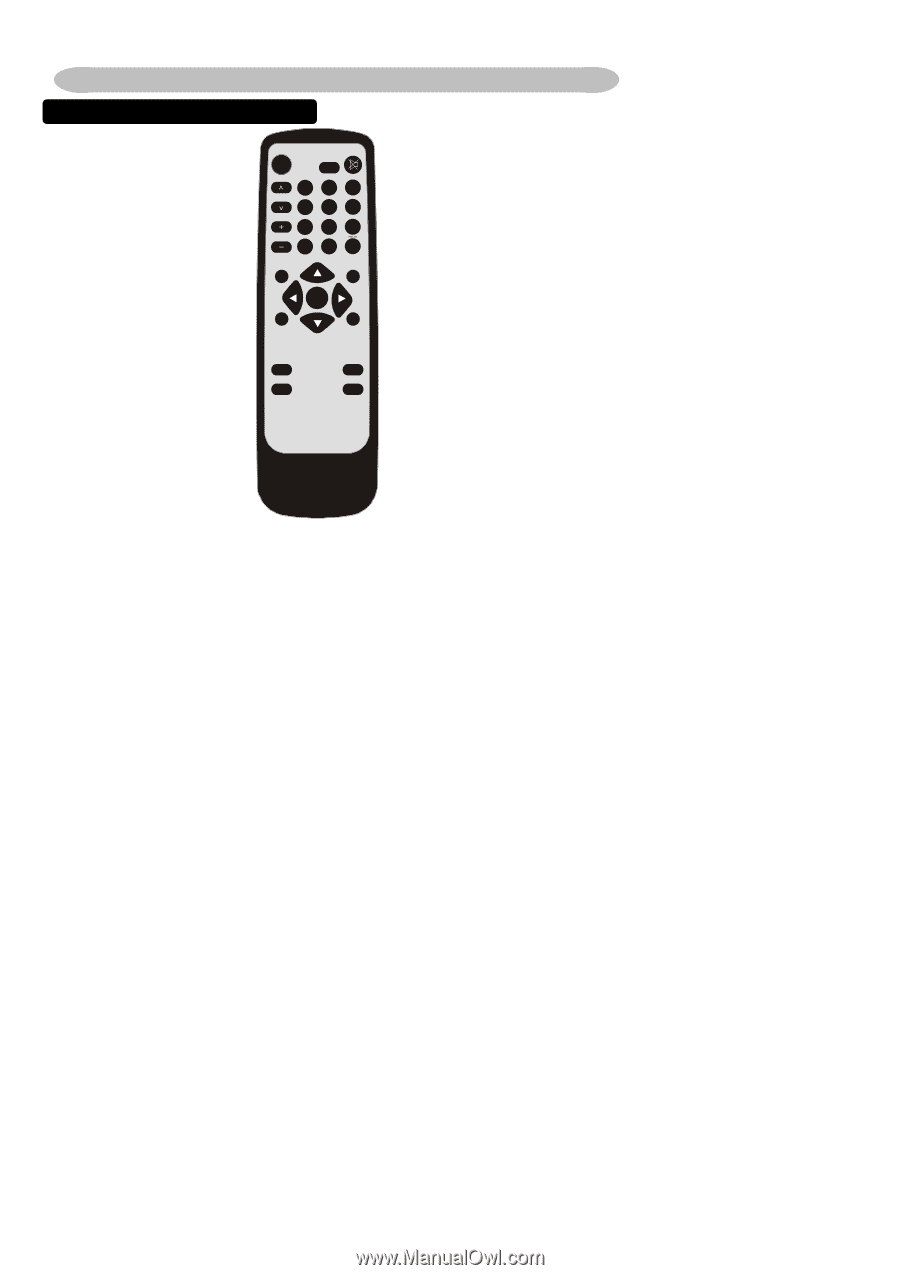
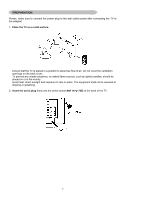
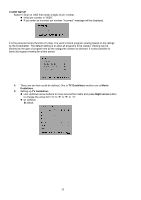
OPERATING INSTRUCTIONS USE OF THE REMOTE CONTROL POWER: Press to turn on/off the TV. The TV is never completely powered off unless it is physically unplugged. 0~9/100 Digit buttons To select a TV channel. CH Press ▲ or▼ to brows through the TV channels which are not erased. To view a blocked channel, use the digit buttons to access the channel and enter your access code. VOL Press + or - to adjust the volume. PC select your input source to PC SLEEP With this key you can set a time period after which the TV should switch itself to standby. Press the key repeatedly to select the number of minutes. The counter runs from 0,30,60,90,120 minutes. The timer begins to count down from the number of minutes selected after the display has disappeared. PIP Press this button to display PC input and other input on the screen at same time. POWER DISPLAY MUTE 1 2 3 CH 4 5 6 7 8 9 VOL 100 0 PC TV/VIDEO SLEEP MENU MTS/SAP V-CHIP PIP CAPTION SIZE ViewSonic MENU Press repeatedly to display OSD menu. V-CHIP Press this button to setup parental control. SWAP Not Supported. (for the model with this function only) SIZE Includes 3 modes.Press repeatedly to select 4:3/ 16:9(Linear)/16:9(nonLinear) POP Not Supported. (for the model with this function only) MUTE Temporarily interrupt the sound or restore it. DISPLAY Press this button to Display Channel number on the right-top corner. MTS /SAP Press this key to activate Multichannel Television Sound, Stereo or Mono PRE-CH To display the previously selected TV channel. TV/VIDEO Select your input source: press repeatedly to select TV, AV1, AV2, S-VIDEO or COMPONENT mode, according to where you connected your external source. AV1/AV2 for a VCR connected to the AV connectors of the TV. S-VIDEO for a S-Video VCR connected to the SVIDEO connector of the TV. COMPONENT for a DVD/DTV Set Top Box or another component video device connected to Y, Pb, Pr and to the AV AUDIO inputs L and R. CAPTION Press this button to turn Closed Caption on. Be sure you have selected Caption On in the Setup menu. 9
-
 1
1 -
2
-
3
-
4
-
5
-
 6
6 -
 7
7 -
 8
8 -
 9
9 -
 10
10 -
 11
11 -
 12
12 -
 13
13 -
 14
14 -
 15
15 -
 16
16 -
17
-
18
-
19
-
20
-
21
-
22
-
23
-
24
-
25
-
26
-
27
-
28
-
29
-
30
-
31
-
32
 |
 |