ViewSonic PJ551 User Guide - Page 13
Basic Operation - reset
 |
UPC - 766907692914
View all ViewSonic PJ551 manuals
Add to My Manuals
Save this manual to your list of manuals |
Page 13 highlights
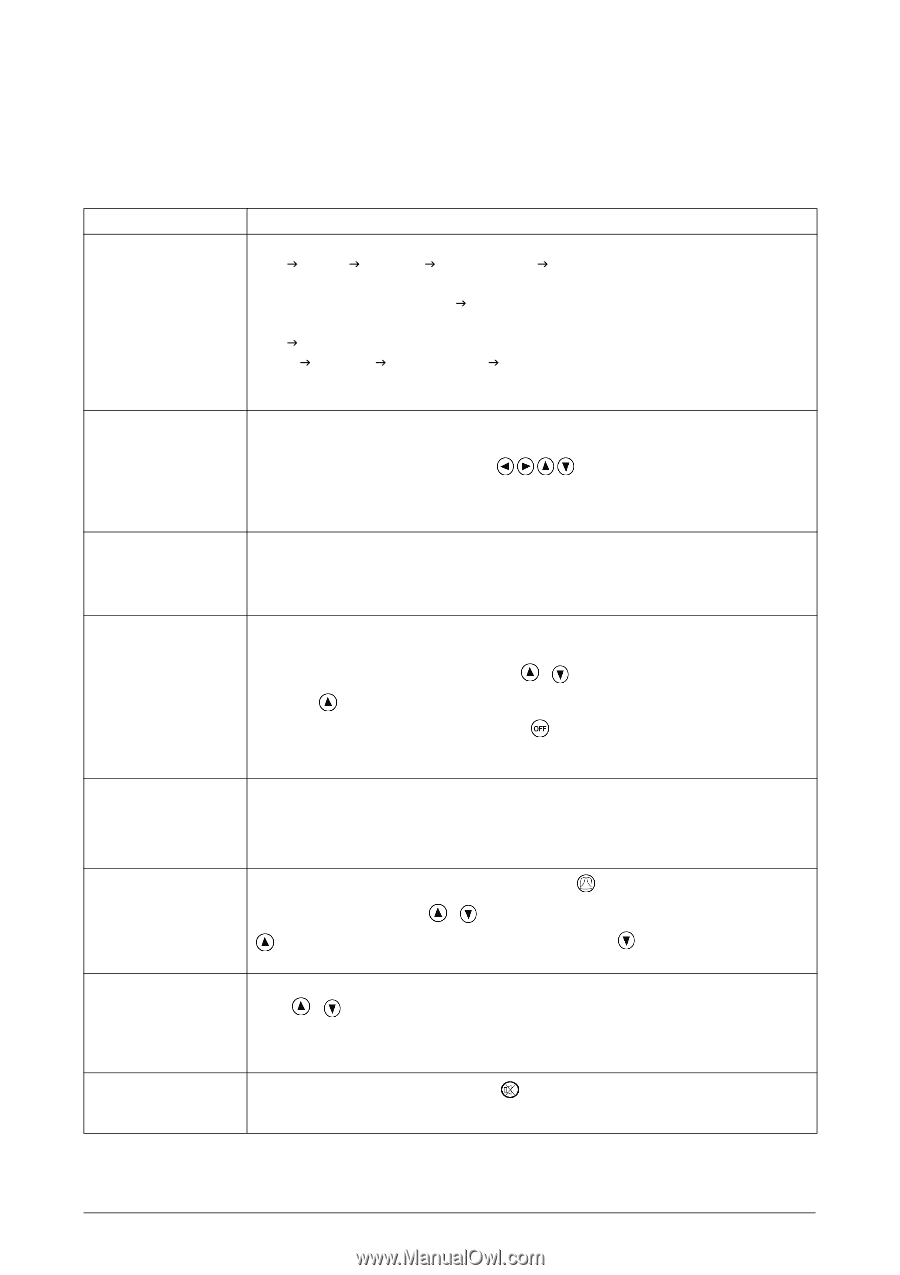
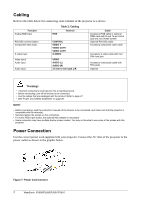
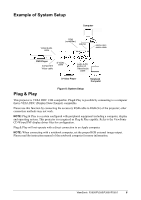
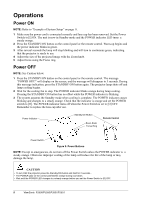
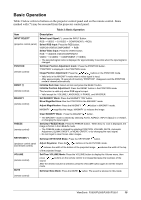
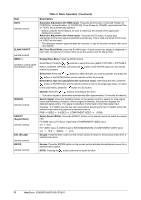
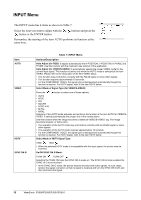
Basic Operation Table 3 below refers to buttons on the projector control panel and on the remote control. Items marked with (*) may be accessed from the projector control panel. Table 3: Basic Operation Item INPUT SELECT (projector control panel) POSITION (remote control) RESET (*) (remote control) MAGNIFY (remote control) Description Select Input Signal (*) : press the INPUT Button. RGB J VIDEO J S-VIDEO J COMPONENT (JRGB) Select RGB Input: Press the RGB button. VIDEO/S-VIDEO/COMPONENT J RGB Select Video Input: Press the VIDEO button. RGB J VIDEO/S-VIDEO/COMPONENT VIDEO J S-VIDEO J COMPONENT (JVIDEO) • The selected signal name is displayed for approximately 3 seconds when the input signal is changed. Set/Clear Position Adjustment mode : Press the POSITION button. "POSITION" is displayed in the POSITION mode. Image Position Adjustment: Press the buttons in the POSITION mode. • Valid only in the MAGNIFY mode when a video signal is input. • After approximately 10 seconds of inactivity "POSITION" disappears and the POSITION mode is cleared automatically. Initialize Each item: Select an item and press the RESET button. Initialize Position Adjustment: Press the RESET button in the POSITION mode. This function is valid only when RGB signal is input. • Valid except for: VOLUME, LANGUAGE, H PHASE, and WHISPER. Set MAGNIFY Mode: Press the MAGNIFY "ON" button. Move Magnified Area: Run the POSITION in the MAGNIFY mode. Adjust Magnification: Press the MAGNIFY / button in MAGNIFY mode. MAGNIFY magnifies the image. MAGNIFY (-) reduces the image. FREEZE (remote control) KEYSTONE (*) (projector control panel and remote control) VOLUME (remote control) MUTE Clear MAGNIFY Mode: Press the MAGNIFY button. • The MAGNIFY mode is cleared by selecting AUTO, ASPECT, INPUT SELECT, or VIDEO, or changing the input signal. Set/Clear FREEZE Mode: Press the FREEZE button. When the [ II ] icon is displayed, the image is frozen in the FREEZE mode. • The FREEZE mode is cleared by selecting POSITION, VOLUME, MUTE, Automatic Adjustment, BLANK ON/OFF, or MENU ON/OFF, or by changing the input signal. • Do not forget to clear frozen static images. Set/Clear KEYSTONE Mode: Press the KEYSTONE button. Adjust Keystone: Press the / buttons in the KEYSTONE mode. reduces the width of the bottom of the projected image. of the projected image. reduces the width of the top Set/Clear VOLUME Mode: Press the VOLUME button to display the Volume menu, then press / sound. buttons on the remote control to increase/decrease the loudness of the After the desired volume is selected, press the VOLUME button again to exit the Volume mode. Set/Clear Mute Mode: Press the MUTE button. The sound is silenced in this mode. (remote control) ViewSonic PJ500/PJ550/PJ501/PJ551 10
-
 1
1 -
2
-
3
-
4
-
5
-
6
-
7
-
 8
8 -
 9
9 -
 10
10 -
 11
11 -
 12
12 -
 13
13 -
 14
14 -
 15
15 -
 16
16 -
 17
17 -
 18
18 -
19
-
20
-
21
-
22
-
23
-
24
-
25
-
26
-
27
-
28
-
29
-
30
-
31
-
32
 |
 |