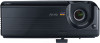
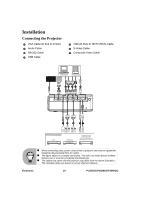
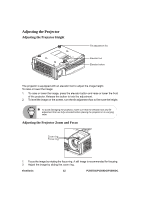
ViewSonic PJ559D User Manual - Page 21
How to operate, Picture Computer / Video Mode
 |
View all ViewSonic PJ559D manuals
Add to My Manuals
Save this manual to your list of manuals |
Page 21 highlights
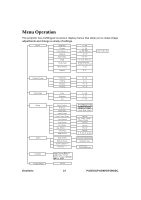
How to operate 1. Press the Menu button on the control panel or the MENU button on the remote control to open the OSD menu. 2. When OSD is displayed, use S / T to select any feature in the main menu. 3. After selecting the desired main menu feature, press X to enter sub-menu for feature setting. 4. Adjust the settings with W / X. 5. Press the Menu buttonon the control panel or the MENU button on the remote control, the screen will return to the main menu. 6. To exit OSD, press the Menu button on the control panel or the MENU button on the remote control again. The OSD menu will close and the projector will automatically save the new settings. Picture (Computer / Video Mode) Brightness Brighten or darken the image. Contrast Set the difference between light and dark areas. Color Setting Adjust the color temperature. At higher temperature the screen looks colder; at lower temperature, the screen looks warmer. If you select "User", "Red", "Green" and "Blue" cab be adjusted. Keystone Correct the keystone distortion. Aspect Ratio Select how the picture fits on the screen: „ 4:3 : The input source will be scaled to fit the projection screen. „ 16:9 : The input source will be scaled to fit the width of the screen. Image There are many factory presets optimized for various types of images. „ PC : For computer or notebook. „ Movie : For home theater. „ sRGB : For PC standard color. „ User : Memorize user's settings. Screen Type Select the projection screen type. White Intensity Increase the brightness of white areas. ViewSonic 15 PJ557DC/PJ559DC/PJ560DC
-
 1
1 -
2
-
3
-
4
-
5
-
6
-
7
-
8
-
9
-
10
-
11
-
12
-
13
-
14
-
15
-
 16
16 -
 17
17 -
 18
18 -
 19
19 -
 20
20 -
 21
21 -
 22
22 -
 23
23 -
 24
24 -
 25
25 -
 26
26 -
27
-
28
-
29
-
30
-
31
-
32
-
33
-
34
-
35
-
36
 |
 |
