ViewSonic PJD6253 PJD5126, PJD6223, PJD6253, PJD6553W User Guide (English) - Page 15
Using the remote mouse control, Remote control effective range, D-Sub / Comp. 1, Mouse
 |
View all ViewSonic PJD6253 manuals
Add to My Manuals
Save this manual to your list of manuals |
Page 15 highlights
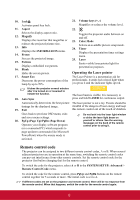
Using the remote mouse control The capability of operating your computer with the remote control gives you more flexibility when delivering presentations. 1. Connect the projector to your PC or notebook with a USB cable prior to using the remote control in place of your computer's mouse. See "Connecting a computer" on page 17 for details. 2. Set the input signal to D-Sub / Comp. 1, D-Sub / Comp. 2 or HDMI. 3. Press Mouse on the remote control to switch from the normal mode to the mouse mode. An icon appears on the screen to indicate the activation of the mouse mode. 4. Perform the desired mouse controls on your remote control. • To move the cursor on the screen, press / / / . • To left-click, press . • To right-click, press . • To operate your display software program (on a connected PC) which responds to page up/down commands (like Microsoft PowerPoint), press PgUp/PgDn. • To return to the normal mode, press Mouse again or other keys except for the mouse related multi-function keys. Remote control effective range Infra-Red (IR) remote control sensors are located on the front and the top of the projector. The remote control must be held at an angle within 30 degrees perpendicular to the projector's IR remote control sensors to function correctly. The distance between the remote control and the sensors should not exceed 8 meters (~ 26 feet). Make sure that there are no obstacles between the remote control and the IR sensors on the projector that might obstruct the infra-red beam. • Operating the projector from the • Operating the projector from the front top Approx. 15° Approx. +15° 10
-
 1
1 -
2
-
3
-
4
-
5
-
6
-
7
-
8
-
9
-
 10
10 -
 11
11 -
 12
12 -
 13
13 -
 14
14 -
 15
15 -
 16
16 -
 17
17 -
 18
18 -
 19
19 -
 20
20 -
21
-
22
-
23
-
24
-
25
-
26
-
27
-
28
-
29
-
30
-
31
-
32
-
33
-
34
-
35
-
36
-
37
-
38
-
39
-
40
-
41
-
42
-
43
-
44
-
45
-
46
-
47
-
48
-
49
-
50
-
51
-
52
-
53
-
54
-
55
-
56
-
57
-
58
-
59
-
60
-
61
-
62
-
63
-
64
-
65
-
66
-
67
-
68
-
69
-
70
-
71
-
72
-
73
-
74
-
75
-
76
-
77
-
78
-
79
-
80
-
81
-
82
-
83
-
84
-
85
-
86
-
87
-
88
 |
 |
