ViewSonic VP191B User Guide - Page 9
Installation of Wall Mount Optional - vesa
 |
UPC - 766907789621
View all ViewSonic VP191B manuals
Add to My Manuals
Save this manual to your list of manuals |
Page 9 highlights
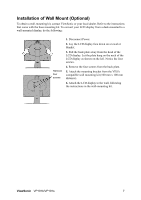
Installation of Wall Mount (Optional) To obtain a wall-mounting kit, contact ViewSonic or your local dealer. Refer to the instructions that come with the base mounting kit. To convert your LCD display from a desk-mounted to a wall-mounted display, do the following: Remove four screws 1. Disconnect Power. 2. Lay the LCD display face down on a towel or blanket. 3. Pull the back plate away from the head of the LCD display. Let the plate hang on the neck of the LCD display as shown on the left. Notice the four screws. 4. Remove the four screws from the back plate. 5. Attach the mounting bracket from the VESA compatible wall mounting kit (100 mm x 100 mm distance). 6. Attach the LCD display to the wall, following the instructions in the wall-mounting kit. ViewSonic VP191b/VP191s 7
-
 1
1 -
2
-
3
-
 4
4 -
 5
5 -
 6
6 -
 7
7 -
 8
8 -
 9
9 -
 10
10 -
 11
11 -
 12
12 -
 13
13 -
 14
14 -
15
-
16
-
17
-
18
-
19
-
20
-
21
-
22
 |
 |
