ViewSonic VT3205LED VT3205LED User Guide M Region (English) - Page 40
Using USB Function - x4
 |
UPC - 766907531213
View all ViewSonic VT3205LED manuals
Add to My Manuals
Save this manual to your list of manuals |
Page 40 highlights
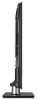
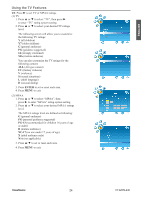
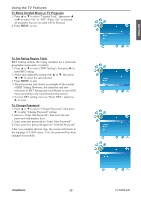
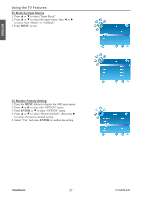
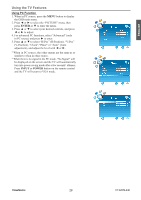
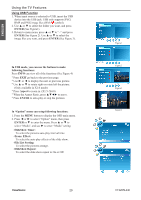
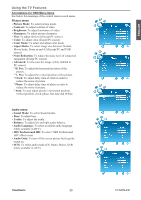
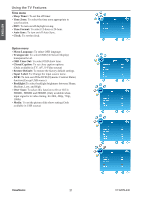
ENGLISH Using the TV Features Using USB Function 1. When input source is selected to USB, insert the USB device into the USB jack. USB only supports JPEG, BMP and PNG image files (With symbol). 2. Use ▲ or ▼ to select the folder you want, and press ENTER (See Figure1). 3. Return to main menu, press ▲ or ▼ to "--" and press ENTER (See Figure 2). Use ▲ or ▼ to select the image files you want, and press ENTER (See Figure 3). In USB mode, you can use the buttons to make following functions: Press INFO can view all of the functions (See Figure 4) * Press EXIT go back to the previous page. * Use ► or ◄ to display the next or previous picture. * Use ▲ or ▼ to rotate right or rotate left the picture. (Only available in X1.0 mode) * Press Aspect to zoom in. (X1.5~X4.0) * When the Aspect Ratio, press to move. * Press ENTER to auto-play or stop the pictures. In "Option" menu can setup following functions: 1. Press the MENU button to display the OSD main menu. 2. Press ◄ or ► to select "Option" menu, then press ENTER or ▼ to enter the menu. Press ▲ or ▼ to select "Media", and use ► to enter "Media" setting. •SlideShow Timer: To select the pictures auto-play interval time. •Trans. Effect: To select the auto-play effects of the slide show. •File List Sorting: To select the pictures arrange. •SlideShow Repeat: To select the slide show repeat to On or Off. ViewSonic 29 Figure1 Figure2 Figure3 Figure4 VT3205LED
-
 1
1 -
2
-
3
-
4
-
5
-
6
-
7
-
8
-
9
-
10
-
11
-
12
-
13
-
14
-
15
-
16
-
17
-
18
-
19
-
20
-
21
-
22
-
23
-
24
-
25
-
26
-
27
-
28
-
29
-
30
-
31
-
32
-
33
-
34
-
 35
35 -
 36
36 -
 37
37 -
 38
38 -
 39
39 -
 40
40 -
 41
41 -
 42
42 -
 43
43 -
 44
44 -
 45
45 -
46
-
47
-
48
-
49
-
50
-
51
-
52
-
53
-
54
-
55
-
56
-
57
-
58
-
59
-
60
-
61
-
62
-
63
 |
 |