Viking 24" Custom Panel Fully Integrated All Freezer Multi-Unit Refrigeration - Page 10
Open both doors to install the trim., When installed,
 |
View all Viking 24" Custom Panel Fully Integrated All Freezer manuals
Add to My Manuals
Save this manual to your list of manuals |
Page 10 highlights
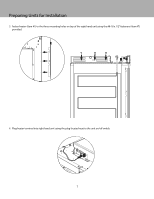
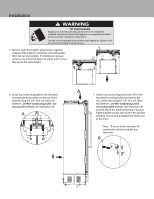
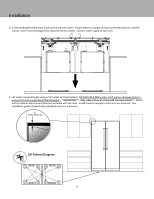
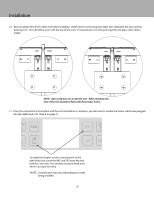
Installation 10. Remove plastic film from center trim before installing. Install center connecting trim (Item #3) in between the two units by pressing it in. Trim should be even with the top of the units. If needed, tap connecting trim gently into place with rubber mallet. NOTE: Open both doors to install the trim. When installed, the face of the trim should be flush with the breaker frame. 11. Once the connection to the heater and the unit installation is complete, you will need to enable the heater which was plugged into the right hand unit. (Step 4 on page 7). To enable the heater, on the control panel* of the right hand unit, press the VAC and UP arrow key and hold for 5 seconds. You will hear an alarm beep once when it accepts the entry. *NOTE: Control panel may vary depending on model being installed. 10
-
 1
1 -
2
-
3
-
4
-
 5
5 -
 6
6 -
 7
7 -
 8
8 -
 9
9 -
 10
10 -
 11
11 -
 12
12 -
 13
13 -
 14
14 -
 15
15 -
16
-
17
-
18
-
19
-
20
-
21
-
22
-
23
-
24
 |
 |
