Viking DGRT3014BBK Quick Reference Guide - Page 1
Viking DGRT3014BBK Manual
 |
View all Viking DGRT3014BBK manuals
Add to My Manuals
Save this manual to your list of manuals |
Page 1 highlights
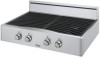
Before Using Rangetop All products are wiped clean with solvents at the factory to remove any visible signs of dirt, oil, and grease which may have remained from the manufacturing process. Before starting to cook, clean the rangetop thoroughly with hot, soapy water. There may be some burn off and odors on first use of the appliance-this is normal. Cooking Vessels Each cook has his or her own preference for the particular cooking vessels that are most appropriate for the type of cooking being done. Any and all cooking vessels are suitable for use in the range and it is not necessary to replace your present domestic vessels with commercial cookware. This is a matter of personal choice. As with any cookware, yours should be in good condition and free from excessive dents on the bottom to provide maximum performance and convenience. Note: When using big pots and/or high flames, it is recommended to use the front burners. There is more room in the front and potential cleanup at rear of appliance due to staining or discoloration will be minimized. Surface Operation Rangetop Features (Professional) Lighting Burners All burners are ignited •by Beelefoctrreicbieggnintinoinn.g, Theprleaasree rneoadoptheens-eflame, hi "stiannsdtriuncgt"iopnisloctos.mpletely med hi and carefully. Surface Burners/ •AuDtOomNOatTicremRoev-eIgpneritmioannently To alifgfihxtedthleabsuerlsfa, cweabrnuirnngesr,s,opr upslahteasndfrotumrnptrhoeduct. This appmroayprviaotied cthoentwroalrrkannotby. counter clockwise to any position. This control is both a gas valve and an electric switch. Burners will ignite at any "ON" poYsiotiuonr swaitfhetthyeaanudtomthaeticsraef-eigtynitoiofnostyhsteerms.iIsf the faluavmtoeemrygatoiicemaslployourtretf-aoignrnati.tney reason, the if the gas is burners will still flowing. When gas is permitted to flow to the burners, the electric ignWiteershsatvaret spproarvkiidnegd. Omnaanllysuimrfapcoertiagnnittesrasfyeotyu shomueldsshaegareas "inclitchkiisngm" asonuunadl .aIfnydooundoyonuort, turn off theapcopnlitaronlcaen.dAclwheacyksthreatatdheanudnitoibs epyluagglled in and thastatfheetyfumseeosrsacigrceusit. breaker is not blown or tripped. WitThhinisa ifsewthme osmafeenttys,aelneortugsyhmgabsowl. iTll hhiasvesytrmavbeolel d to tahleerbtsurynoerutotolighhatz.aWrdhsenththaet cbaunrnekrillligohrths,utrutrn theybouurnaenrdcoontthroelrsto. any position to adjust the flame size. Setting the proper flame height for the desired coAokllinsgafpertoycemsseasnsdagseelsecwtiinllgbtehepcroercreecdtecdoobkyintghe vesssaeflewtyillarleesrutltsiynmsubpoel raionrdcothoekinwgoprderformance, wseulherT"ifcDlahetcrAeoeaNsnlsbeiGocuwriEsgnaoRnevriri,tdns"egsor"WratmiugmAetroeiRallmanNbna:uItdNricneaGenlrl"eysroaegrcxytt."iivCnIfagAatuenUisyshTtoo,InOtrheeNe-ol.ir"gmhtotrhee D A N G E R flame. DO NOT TOUCH THE BURNERS WHEN THE IGNITERS ARE ACTIVE. Hazards or unsafe practices It is nwothuicnchoWmmILoLn rtoessueelteixntinsgeuvieshreedpfelarmseosn, awlhen: • Proper ventilatioinnjius rnyotourseddeath • When the oven door is opened or closed rapidly W A R N I N G • When spillover of liquids or foods occur • When the incorrect gas or impure gas is used Hazards or unsafe practices SurwfahcicehCCoOoUkLinDgreTsipulst in severe personal • Use low or mediuinmjuflraymoe rhediegahttshwhen cooking in vessels that are poor conductors of heat, such as C A U T I O N glass, ceramic, and cast-iron. Reduce the flame height until it covers approximately 1/3 of the cookHinagzvaersdsselodriaumnestear.feThpisrawciltliecnessurwe hmiocrhe even hCeOatUinLgDwirtehisnutlhteincomokiinngorvepsesersl aonndarleidnujcuerythoer likelihood of buprrnoinpgeorrtyscdoarcmhinaggethe food. • Reduce the flame if it is extending beyond the bottoAmllosfatfheetycomokeisnsgavgeesssewl. iAll fildaemnetitfhyattheextends iadnlahosontanefgzgaeiandtrtrhojhudoeuer,fsyst,t,iihednhealeeslnsatfyrodtouosofcutdtetht,hihleolaeonnyuwvsdoteeusawntsorsaweeisllrhtehinesaadsotpnutedoccnflatoeeeenlrnlatgothnhiywaed.alelpykcdpiht.ceahnnecnife ••ReAdllulcoecathl eanfdlamnaetihoeniaglhctotdoetshaenmdinoirmdiunmanlceevseml ust be neocbessesravreydt.oInpsetraflolartmionthme udsetsciroendfocromokwinitghploroccael scso.des Reomr ienmthberatbhsaetnfcoeodofccooodkessj,utshteasNqautiiocnklayl aFtuael Gas geCnotdleebAoNil SaIsZit22d3o.e1sNaFt PaAr5o4ll-inlagtebsot iel.dMitiaoin.taining a •hiTgherinbsotaillltehramn uisstnelecaevsesatrhyewseasintestsruecnteiorgnys, wcoitohks awthaey cmoonissutumre,r afonrdlocacaulseinssapelocstosri'ns ufoseodanfldavfor and nufutrtiuernet rlefveerle. nce. • The minimum pot or pan (vessel) diameter Inrestcaollmatmioennodfeadniys g6a"s(-1fi5recdme)q. Uuispemoefnptosthsoourldpabnesmasade bsymaalilcaesns4e"d(1p0lucmmb)eisr. pAomssaibnlueabl ugtansosthut-off valve mreucstombemiennstdaellde.d in the gas supply line ahead of the Heat Setting Simmer Use Melting small quantities Steaming rice Simmering sauces Low Med Low Melting large quantities Low-temperature frying (eggs, etc.) Simmering large quantities Heating milk, cream sauces, gravies, and puddings Med Med High Sauteing and browning, braising, and pan-frying Maintaining slow boil on large quantities High-temperature frying Pan broiling Maintaining fast boil on large quantities High Boiling water quickly Deep-fat frying in large cookware FIRE/EXPLOSION HAZARD SuIFrfTaHceEHINeFatOSReMttAinTgIOs N IN THIS NoMteA: NThUeAabLovISe inNfoOrmTatFioOnLisLgOivWenEasDa guide only. CAUTION DO NOT heat empty cookware or let cookware boil dry. The cookware can absorb an excessive amount of heat very quickly, resulting in possible damage to the cookware and ceramic glass. YoEu XmAayCnTeLedY,toAvaFryIRthEe hOeaRt sEetXtinPgLsOtoSsIuOit Nyour peMrsoAnYal RreEquSirUemLeTntCs.AUSING PROPERTY DAMAGE, PERSONAL INJURY, OR 1 2 3 4 GRIDDLE 5 6 9 7 8 10 11 1. Left rear burner control knob 2. Left front burner control knob 3. Char-Grill control knob 4. Griddle control knob 5. Right rear burner control knob 6. Right front burner control knob 7. Griddle indicator light 8. Four 15,000 BTU sealed burners with porcelain/cast iron caps and automatic 12 ignition/re-ignition 9. Stainless steel island trim 10. Char-Grill (optional) 8 11. Griddle (optional) 12. Identification plate 48" four burner/Char-Grill/griddle model shown BURN HAZARD TVhaeruiSsiemomf cearb™inets for storage above the aSpimplmiaenrcinegmisaaycroeoskuinltginteachpnoiqteunetiinalwbhuicrnh foods are hcaozoakredd. iCnohmotbluiqsutiidbslekeitpetmast omrajuystigbnairteel,y below the mbeoitlainllgicpitoeinmt sofmwaaytebr.eScimommeerhinogt eannsdurceas ugseentler bturerantsm. eIfntathcaanbibnoeitlinsgtotroagpereivsentot fboeodprfroovmided thtoeugrihsekncinagnabned/roerdburceeadkinbgyuinps. tTahlleinsgizea of the pan and the volume of food can have a significant effect C A U T I O N on how high or low a flame is needed for simmering. For this reason, Viking range and rangetop burners are engineered with a VariSimmer setting. The BVeafroiSriemmplearcsinetgtinthgeiscnoootkjutospt oinnetosiompmeerar tsieotnti,ng, but aplwroaviydseschaevcakriafbolregraansgleeaofkssimwmitherasestotinagpsy. This wvaartiearblseorlauntgioenoof rsiomtmheerr asectctienpgtsaabllloewms eyothuotdo.adjust DthOe NflaOmTe UheSigEhtAtNo aOchPiEevNe tFhLeAbMesEt sTimOmer CdHepEeCndKinFgOoRn tLhEeAtyKpSe.and quantity of food being simmered. It is this ability that makes the VariSimmer setting the most accurate and trustworthy simmer on W the market. A R N I N G A qualified installer should carry out the following cheTcrkus:Power Plus™ Burner (where applicable) Certain model ranges are equipped with a TruPower h PClhuesc1k8t,o50p0bBuTrnUerbiugrnietiroin. tThheefrlonwt frliagmhtebsuhronuelrd pligohsittiaotne. vTehriys pbourtn.er is designed to provide extrah hSitgahrtihnegawt oituhttphuet,leefstpecially when using large pans, afrnodntshbouurnlderb, etuurnsetdhefocrobrroeislipnognldairngge kqnuoabnttiotietsheorHiIf ypoousitnieoend-tsoeebrdinrgawsionmgefothrinpgrotpoear fblaomilequhiecikglhy.t.While tIhMePTOruRPToAwNeTr:PAlunsybcuornnveerrhsaiosnthreqeuxitrreadpmowuesrt nbeeeded tpoebrfroinrgmleadrgbeyqyuoaunrtitdieesaloefrlioqruaidqtuoaalifbieodil rliacpeindslye,dit is apllsuomabbeler toor bgeastusrenrevdicedocwonmlpoawnye.nTohueghprtopperrovide a vceornyvleorwsioandkidtemlicuasttebseimomrdeer rmedakfinrogmthyisoubrurner the mauotshtovreizrseadtilseerovnicteheagmeanrckyeto. r dealer. h Repeat steps for other burners. This appliance shall not be used for space heating. This information is based on safety considerations. Rangetop Features (Designer) 1 2 3 4 5 7 6 10 36" five burner model shown 8 9 11 1. Left front burner control knob 2. Left rear burner control knob 3. Center control knob 4. Right rear burner control knob 5. Right front burner control knob 6. 30" model - One 12,000 BTU sealed burners with porcelain/cast iron caps and automatic ignition/re-ignition 36" model - One 16,000 BTU sealed burners with porcelain/cast iron caps and automatic ignition/re-ignition 7. 30" model - One 10,000 BTU sealed burners 12 with porcelain/cast iron caps and automatic ignition/re-ignition 36" model - One 12,000 BTU sealed burners with porcelain/cast iron caps and automatic ignition/re-ignition 8. Stainless steel island trim 9. 36" model - One 16,000 BTU sealed burners with porcelain/cast iron caps and automatic ignition/re-ignition 10. Identification plate 11. 30" & 36" models - One 6,000 BTU sealed burners with porcelain/cast iron caps and automatic ignition/re-ignition 12. 30" & 36" models - One 8,000 BTU sealed burners with porcelain/cast iron caps and automatic ignition/re-ignition Char-Grill (Professional) Char-Grill (on applicable models) The optional 18,000 BTU char-grill is equipped with Grill a single piece, heavy-duty porcelainized cast-iron grill Flavorgenerator plates grate for easy movement of grilling items. Beneath Two-piece drip pan the grill grate is a slotted porcelainized flavor- Burner Drip tray generator plate which is designed to catch drippings and circulate a smoke flavor back into the food. Beneath the flavor-generator plate is a two-piece drip pan which catches any drippings that might pass beyond the flavor-generator plate. This unique grilling system is designed to provide outdoor quality grilling indoors. Char-Grill Operation • Turn the overhead ventilation on prior to turning the grill on. • Turn the grill knob counterclockwise to "HI". • Always preheat the grill for 5-10 minutes before placing food on the grill grate. • Place food items on the grill, cook as desired. • To turn the grill off, turn the grill knob clockwise to the "OFF" position. Char-Grill Cooking Tips • When grilling chicken, roasts, well-done steaks or chops, and thick pieces of meat, sear on "HI". Then, reduce the heat setting to prevent excessive flare-up. This will allow the food to cook through without burning the outside. • After steaks, chops, or hamburgers have been allowed to sear for approximately one minute, you may slide a spatula under the meat and turn it approximately 90 degrees to create a waffle pattern. • Use a metal spatula instead of tongs or a fork to turn the meat. A spatula will not puncture the meat allowing juices to escape. • Turn the meat over only once. Juices are lost when steaks, chops or hamburgers are turned several times. The best time to turn the meat is after the juices have begun to bubble to the surface. • To test for doneness, make a small slash in the center of the meat, not the edge. This will prevent loss of juices. • Occasionally there may be flare-ups or flames above the grill due to drops of fat falling on the flavorgenerator plates. Use a long handled spatula to move food to another area until the flames subside. • For ease of cleaning, leave the char-grill on for 10 Built-In Cooktops minutes when finished grilling. This will help make cleanup easier once the char-grill has cooled down and lower the heat between cooking.
-
 1
1 -
 2
2
 |
 |
