Viking RDEWD103SS Use and Care Manual - Page 8
Operation
 |
View all Viking RDEWD103SS manuals
Add to My Manuals
Save this manual to your list of manuals |
Page 8 highlights
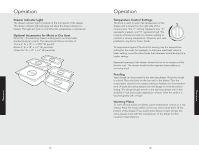
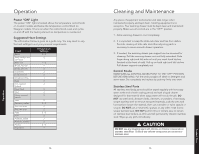
Operation Operation Power "ON" Light The power "ON" light is located above the temperature control knob on Custom models and below the temperature control knob on Designer models. It turns on when the control knob is set and cycles on and off with the heating element as temperature is maintained. Suggested Heat Settings The information below is given as a guide only. You may need to vary the heat settings to suit your personal requirements. Food Bacon Beef, medium and well done Beef, rare Bread, hard roll Bread, soft rolls Casseroles Cooked cereal Dough, proofing Eggs Fish, seafood (baked) Fried foods Fruit Gravy, creamed sauces Ham Pancakes, waffles Pies, one crust Pies, two crust Pizza Pork Potatoes, baked Potatoes, mashed Poultry Vegetables Temperature Settings 2-3 2 1-2 2 2 2 2 1 2 2 3 2 2 2 2-3 2 2 2-3 2 3 2 2-3 2 14 Cleaning and Maintenance Any piece of equipment works better and lasts longer when maintained properly and kept clean. Cooking equipment is no exception. Your warming drawer must be kept clean and maintained properly. Make sure all controls are in the "OFF" position. 1. Allow warming drawer to cool completely. 2. It is important to keep the slide rails clear and free from debris. Periodic cleaning of slide rails and other adjoining parts is necessary to assure smooth drawer operation. 3. If needed, the warming drawer pan support can be removed for cleaning. Pull the warming drawer out until fully extended. Slide finger along right and left side rail until you reach hand latches (located at the front of rails). Pull up on both right and left latches. Pull drawer support completely out. Control Knobs MAKE SURE ALL CONTROL KNOBS POINT TO THE "OFF" POSITION BEFORE REMOVING. Pull the knobs straight off. Wash in detergent and warm water. Dry completely and replace by pushing firmly onto stem. Stainless Steel Parts All stainless steel body parts should be wiped regularly with hot soapy water at the end of each cooling period and with a liquid cleaner designed for that material when soapy water will not do the job. DO NOT use steel wool, abrasive cloths, cleansers, or powders. If necessary, scrape stainless steel to remove encrusted materials, soak the area with hot towels to loosen the material, then use a wooden or nylon spatula or scraper. DO NOT use a metal knife, spatula, or any other metal tool to scrape stainless steel. DO NOT permit citrus or tomato juice to remain on stainless steel surface, as citric acid will permanently discolor stainless steel. Wipe up any spills immediately. CAUTION DO NOT use any cleaning agent with chlorine or chlorine compounds on stainless steel finish. Chlorine and chlorine compounds are corrosive to stainless steel. 15 Product Care
-
 1
1 -
2
-
 3
3 -
 4
4 -
 5
5 -
 6
6 -
 7
7 -
 8
8 -
 9
9 -
 10
10
 |
 |
