Viking RDSCE2305BSS Countertop Side Trim - Installation Instructions - Page 2
Installation
 |
View all Viking RDSCE2305BSS manuals
Add to My Manuals
Save this manual to your list of manuals |
Page 2 highlights
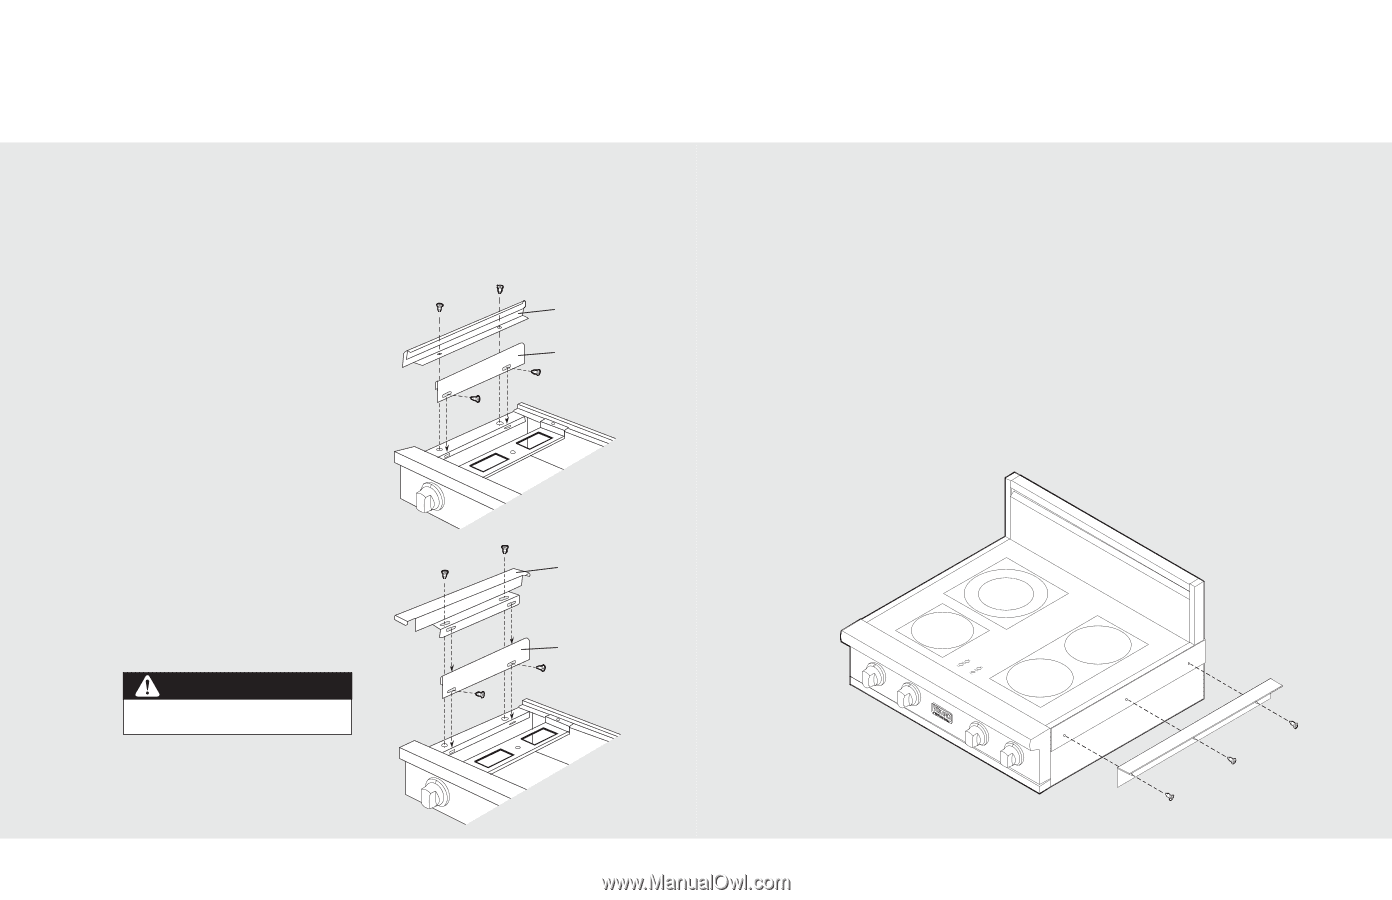
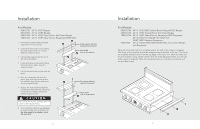
Installation For Models: R24CSTSS - 24" D. VGIC Ranges R27CSTSS - 27" D. VGRC Ranges S24CSTSS - 24" D. VGSC Open Burner Self-Clean Ranges T24CSTSS - 24" D. VGRT Open Burner Rangetops/VGWT Wok 1. Remove the outside grates and grate supports next to the counter. 2. Locate and remove the screws holding the grate support side trim in place. Keep the screws for reuse. 3. Lift the grate support side trim out. It will not be reinstalled. 4. Locate and remove the screws holding the heat shield in place. Keep the screws for reuse. 5. Lift the heat shield out and set aside for reuse. 6. Place the countertop side trim into place. Align with the countertop and the landing ledge. Replace and secure with the original screws. 7. Replace the heat shield and align the slotted screw holes with the screw holes in the side trim. Replace and secure with the original screws. CAUTION The heat shield must be replaced only if it is part of the original product. 8. This countertop side trim was designed to accommodate most installations. If the trim needs to be shorter, cut at the rear to fit. Grate support side trim (standard with product) Heat shield (not on all products) Countertop side trim (optional accessory) Heat shield (not on all products) 2 Installation For Models: RE24CSTSS - 24" D. VGIC/VDSC Sealed Burner Ranges/VESC Ranges SE24CSTSS - 24" D. VGSC Sealed Burner Self-Clean Ranges TE24CSTSS - 24" D. VGRT Sealed Burner Rangetops/VERT Rangetop/ 24" W. VGGT Griddle/24" W. VGQT Grill DGRT, DERT Designer Rangetops P24CSTSS - 24" D. VGCC/VGSC/VDSC/VESC/VISC and Custom Ranges and Rangetops Place the countertop side trim template against the side of the range or rangetop. The flange of the template should be wrapped around the back of the unit. The top of the template should be even with the top edge of the outer trim. Mark the holes and remove template. Using a 9/64" drill bit, drill the three designated holes into the side of the range or rangetop. Place the countertop side trim into place and secure with the provided screws. 3
-
 1
1 -
 2
2
 |
 |