Viking RVEWD Quick Reference Guide - Page 1
Viking RVEWD Manual
 |
View all Viking RVEWD manuals
Add to My Manuals
Save this manual to your list of manuals |
Page 1 highlights
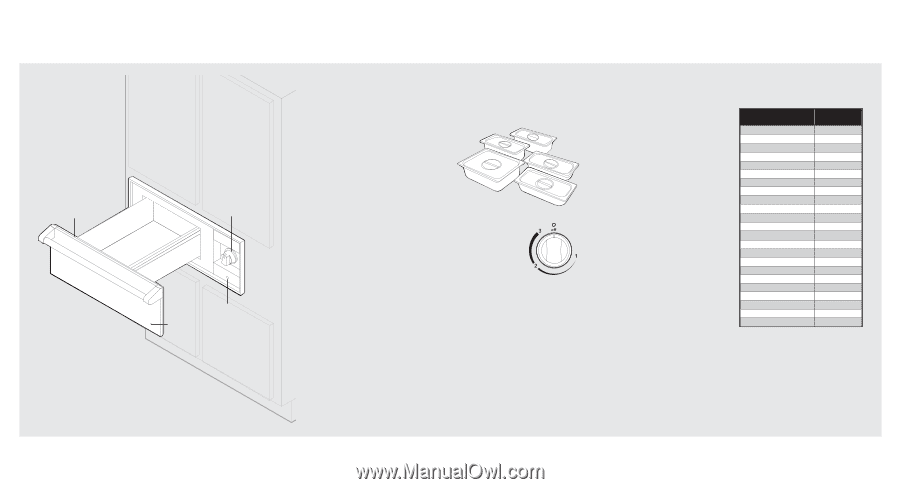
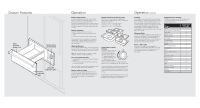
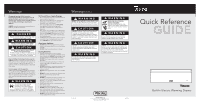
Drawer Features Vents (located inside unit) Temperature control knob ON/OFF indicator light Drawer indicator light Operation Before Using Drawer All products are wiped clean with solvents at the factory to remove any visible signs of dirt, oil, and grease which may have remained from the manufacturing process. Before using, clean the drawer thoroughly with hot, soapy water. There may be some burn off and odors on first use of the appliance-this is normal. Drawer Functions Your warming drawer works in two ways: 1. Seals moisture within the drawer to keep food moist. 2. Allows moisture to escape and keep food crisp. The purpose of the warming drawer is to keep hot, cooked foods at serving temperature. Always start with hot food; cold food cannot be heated in the warming drawer. Warming Element Turn the control knob clockwise to the desired setting. The element will cycle on and off to maintain the desired heat setting. When finished turn the control to "OFF." Note: The majority of foods are held at a medium setting to maintain a serving temperature. To use Dry Heat Function 1. Place the food or cookware with food in the empty drawer pan. 2. Turn the control knob to the desired heat setting and close the drawer. Use dry heat when warming dishes and keeping foods crispy such as pies, breads and fried foods. Drawer Indicator Light The drawer indicator light is located on the front panel of the drawer. The drawer indicator light will glow blue when the drawer element is heated. The light will cycle on and off as the temperature is maintained. Optional Accessories for Dry Heat Pans/Lids - This warming drawer is designed to accommodate standard size pan inserts. The optional pan/lid set consists of: 1) one 4" D. x 12" L. x 10½" W. pan/lid 2) two 4" D. x 12" L. x 7" W. pans/lids 3) two 2½" D. x 12" L. x 7" W. pans/lids Temperature Control Settings The knob is used to select the temperature of the drawer and is located on the right side of the control panel. The "1" setting represents low, "2" represents medium, and "3" represents high. The majority of foods are held at a medium setting to maintain a serving temperature. However, your own preference may be for hotter foods. To keep several types of food hot for serving, key the temperature setting for the meat. For example, to hold rare roast beef, select a lower setting, cover the other foods that otherwise would be kept at a higher setting. Repeated opening of the drawer allows the hot air to escape and the food to cool. The drawer should not be opened unless adding or removing food. Operation (cont.) Proofing Yeast dough can be proofed in the warming drawer. Place the dough in a bowl. Place the bowl on the low rack in the drawer. Turn the temperature control to the lowest setting to facilitate the fermentation time. A towel should be placed over the dough to minimize surface drying. The dough should remain in the warming drawer until it has doubled in size and a slight depression remains when the surface is touched gently with a finger. Warming Plates To warm serving bowls and plates, place temperature control on a low setting. Place the empty dishes on the low rack to raise them off the bottom of the drawer. If you want hotter dishes or want to heat fine china, please check with the manufacturer of the dishes for their maximum heat tolerance. Power "ON" Light The power "ON" light is located below the temperature control knob on D3 models. It turns on when the control knob is set and cycles on and off with the heating element as temperature is maintained. Suggested Heat Settings The information below is given as a guide only. You may need to vary the heat settings to suit your personal requirements. Food Bacon Beef, medium and well done Beef, rare Bread, hard roll Bread, soft rolls Casseroles Cooked cereal Dough, proofing Eggs Fish, seafood (baked) Fried foods Fruit Gravy, creamed sauces Ham Pancakes, waffles Pies, one crust Pies, two crust Pizza Pork Potatoes, baked Potatoes, mashed Poultry Vegetables Temperature Settings 2-3 2 1-2 2 2 2 2 1 2 2 3 2 2 2 2-3 2 2 2-3 2 3 2 2-3 2
-
 1
1 -
 2
2
 |
 |