Viking RVGR3302 Quick Reference Guide - Page 1
Viking RVGR3302 Manual
 |
View all Viking RVGR3302 manuals
Add to My Manuals
Save this manual to your list of manuals |
Page 1 highlights
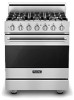
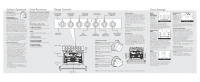
Surface Operation Lighting Burners All burners are ignited by electric ignition. There are no openflame, "standing" pilots. Surface BurnersAutomatic Re-ignition To light the surface burners, push and turn the appropriate control knob counter clockwise to any position. This control is both a gas valve and an electric switch. Burners will ignite at any "ON" position with the automatic re-ignition system. If the flame goes out for any reason, the burners will automatically reignite if the gas is still flowing. When gas is permitted to flow to the burners, the electric igniters start sparking. On all surface igniters you should hear a "clicking" sound. If you do not, turn off the control and check that the unit is plugged in and that the fuse or circuit breaker is not blown or tripped. Within a few moments, enough gas will have traveled to the burner to light. When the burner lights, turn the burner control to any position to adjust the flame size. Setting the proper flame height for the desired cooking process and selecting the correct cooking vessel will result in superior cooking performance, while also saving time and energy. Surface Cooking Tips • Use low or medium flame heights when cooking in vessels that are poor conductors of heat, such as glass, ceramic, and cast-iron. Reduce the flame height until it covers approximately 1/3 of the cooking vessel diameter. This will ensure more even heating within the cooking vessel and reduce the likelihood of burning or scorching the food. • Reduce the flame if it is extending beyond the bottom of the cooking vessel. A flame that extends along the sides of the vessel is potentially dangerous, heats the utensil handle and kitchen instead of the food, and wastes energy. • Reduce the flame height to the minimum level necessary to perform the desired cooking process. Remember that food cooks just as quickly at a gentle boil as it does at a rolling boil. Maintaining a higher boil than is necessary wastes energy, cooks away moisture, and causes a loss in food flavor and nutrient level. • The minimum pot or pan (vessel) diameter recommended is 6" (15 cm) on the larger burners. Pots or pans as small as 4" (10 cm) should be used on the smaller burners. Oven Functions Conventional and Convection Cooking Because of variations in food density, surface texture and consistency, some foods may be prepared more successfully using the conventional bake setting. For this reason, conventional baking is recommended when preparing baked goods such as custard. The user may find other foods that are also prepared more consistently in conventional bake. It is recommended to use this function for single-rack baking. • BAKE (Natural Airflow Bake) Use this setting for baking, roasting, and casseroles. • CONVECTION BAKE Use this setting to bake and roast foods at the same time with minimal taste transfer. • BROIL Use this setting for broiling dark meats at 1" thickness or less where rare or medium doneness is desired. • CONVECTION BROIL Use this setting to broil thick cuts of meat. • Convection Dehydrate (CONVECTION BAKE) Use this function to dehydrate fruits and vegetables. • Convection Defrost (CONVECTION BAKE) Use this function to defrost foods. Range Controls Left Front Burner Control Knob (18,000 BTU) Left Rear Burner Control Knob (8,000 BTU) Center Burner Control Knob (9,000 BTU) Interior Oven Light Button Oven Function Selector Knob Broiler burner (3) Oven racks Oven lights Convection fan Bake burner Self-Clean Indicator Light Right Rear Burner Control Knob (12,000 BTU) Oven Temperature Control Knob Oven Temperature Indicator Light Right Front Burner Control Knob (18,000 BTU) Surface Heat Settings* MED HI Maintaining fast boil on large quantities, high temperature frying, and pan broiling HI Boiling water quickly, deep-fat frying in large utensil Sim Melting small quantities, steaming rice, and simmering sauces LO Melting large quantities MED LO Simmering large quantities, low temperature frying (eggs, etc.), heating milk, cream sauces, gravies, and pudding MED Maintaining slow boil on large quantities, sauteing, browning, braising and panfrying Cooking Vessels Each cook has his or her own preference for the particular cooking vessels that are most appropriate for the type of cooking being done. Any and all cooking vessels are suitable for use in the range and it is not necessary to replace your present domestic vessels with commercial cookware. This is a matter of personal choice. As with any cookware, yours should be in good condition and free from excessive dents on the bottom to provide maximum performance and convenience. Note: When using big pots and/or high flames, it is recommended to use the front burners. There is more room in the front and potential cleanup at rear of appliance due to staining or discoloration will be minimized. Rack Positions Each oven is equipped with three racks (some models include 1 or more TruGlide racks). All ovens have six rack positions. Position 6 is the farthest from the oven bottom. Position 1 is the closest to the oven bottom. The racks can be easily removed and arranged at various levels. For best results with conventional baking, DO NOT use more than one rack at a time. It is also recommended, when using two racks, to bake with the racks in positions 2 and 4 or positions 3 and 5. 95% 6 80% 5 65% 4 50% 3 35% 2 25% 1 *Note: The above information is given as a guide only. You may need to vary the heat settings to suit your personal requirements. Oven Settings BAKE (Natural Airflow Bake) Full power heat is radiated from the U-shaped bake burners in the bottom of the oven cavity and is natural airflow bake circulated with natural airflow. This function is recommended for single rack baking. Many cookbooks contain recipes to be cooked in the conventional manner. Conventional baking is suitable for dishes that require a high temperature. Use this setting for baking and casseroles. CONVECTION BAKE Heat is radiated from the U-shaped bake burners in the bottom of the oven cavity. The heated air is circulated by one motorized fan convection bake in the rear of the oven providing a more even heat distribution. Multiple rack use is possible for the largest baking job. When roasting, cool air is quickly replaced-searing meats on the outside and retaining more juices and natural flavor on the inside with less shrinkage. This even circulation of air equalizes the temperature throughout the oven cavity and eliminates the hot and cold spots found in conventional ovens. BROIL Heat radiates from the broiler located at the top of the oven cavity. The distance between the foods and the broil elements determines broiling broil speed. For "fast" broiling, food may be as close as 2 inches (5 cm) to the broil element. "Fast" broiling is best for meats where rare to medium doneness is desired. Use this setting for broiling small and average cuts of meat. CONVECTION BROIL The top burner operates at full power. This function is exactly the same as regular broiling with the additional benefit of air convection broil circulation by the motorized fan in the rear of the oven. Smoke is reduced since the airflow also reduces peak temperatures on the food. Use this setting for broiling thick cuts of meats. Convection Dehydration This oven is designed not only to cook, but also to dehydrate fruits and vegetables. Warm air is circulated by a motorized fan in the rear of the oven and over a period of time, the water is removed from the food by evaporation. Removal of water inhibits growth of microorganisms and retards the activity of enzymes. It is important to remember that dehydration does not improve the quality, so only fresh, top-quality foods should be used. 1. Prepare the food as recommended. 2. Arrange the food on drying racks (not included with the oven; contact a local store handling speciality cooking utensils). 3. Set the temperature control to 200°F (93.3°C) and turn the selector to "Convection Bake". Convection Defrost Air is circulated by a motorized fan in the rear of the oven. The fan accelerates natural defrosting of the food without heat. To avoid sickness and food waste, DO NOT allow defrosted food to remain in the oven for more than two hours. 1. Place the frozen food on a baking sheet. 2. Set the oven temperature control knob to "OFF" and turn the selector to "Convection Bake".
-
 1
1 -
 2
2
 |
 |
