Viking VBI7360W Multi-Unit Refrigeration Connector Kit - CKVBI - Installation - Page 5
Anti-tip Location, Anti-tip Bracket
 |
View all Viking VBI7360W manuals
Add to My Manuals
Save this manual to your list of manuals |
Page 5 highlights
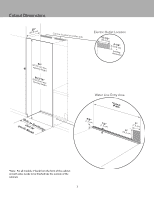
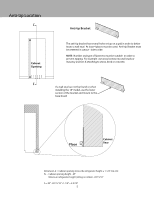
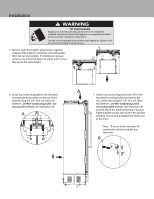
Anti-tip Location C Cabinet Opening Anti-tip Bracket The anti-tip bracket has several holes set up on a grid in order to better locate a wall stud. At least 4 places must be used. Anti-tip Bracket must be centered in cutout - side to side. NOTE: Number and type of fasteners must be suitable in order to prevent tipping. For example: use wood screws into wall studs or masonry anchors if attaching to stone, brick or concrete. C If a wall stud can not be found or when installing the 18" model, use the lower section of the bracket and mount to the base board Floor A Cabinet Rear Dimension A = Cabinet opening minus the refrigerator height + 1-1/4" (3.2 cm) Ex. - Cabinet opening height - 85" Minimum refrigerator height (sitting on rollers) - 83 15/16" A = 85" - 83-15/16" +1-1/4" = 2-5/16" 5
-
 1
1 -
 2
2 -
 3
3 -
 4
4 -
 5
5 -
 6
6 -
 7
7 -
 8
8 -
 9
9 -
 10
10 -
 11
11 -
12
-
13
-
14
-
15
-
16
-
17
-
18
-
19
-
20
-
21
-
22
-
23
-
24
 |
 |
